When it comes to permanently deleting sensitive files or securely wiping an entire drive, simply moving data to the Recycle Bin isn't enough. That’s where Aiseefox Dr.Wiper comes in — a powerful, cross-platform data erasing tool designed to help Windows and Mac users securely wipe disks, erase files beyond recovery, and clear free space to eliminate traces of previously deleted data. Whether you're preparing a computer for resale or simply ensuring your privacy, Dr.Wiper uses industry-recognized data sanitization algorithms to make sure your information is gone for good. In this tutorial, we’ll walk you through how to use Dr.Wiper for safe and effective data erasure.
Part 1. How to Permanently Wipe a Disk with Dr.Wiper
Permanently wiping a disk with Aiseefox Dr.Wiper ensures that all data on the drive is securely erased and cannot be recovered, even with professional recovery tools. This is ideal if you're selling, donating, or disposing of your storage device.
Step 1Download and Install Dr.Wiper on Your Computer
First things first, download Dr.Wiper from the official site and install it. It's quick to set up and doesnt come with any unnecessary add-ons, which I always appreciate.
Free Trial Free Trial
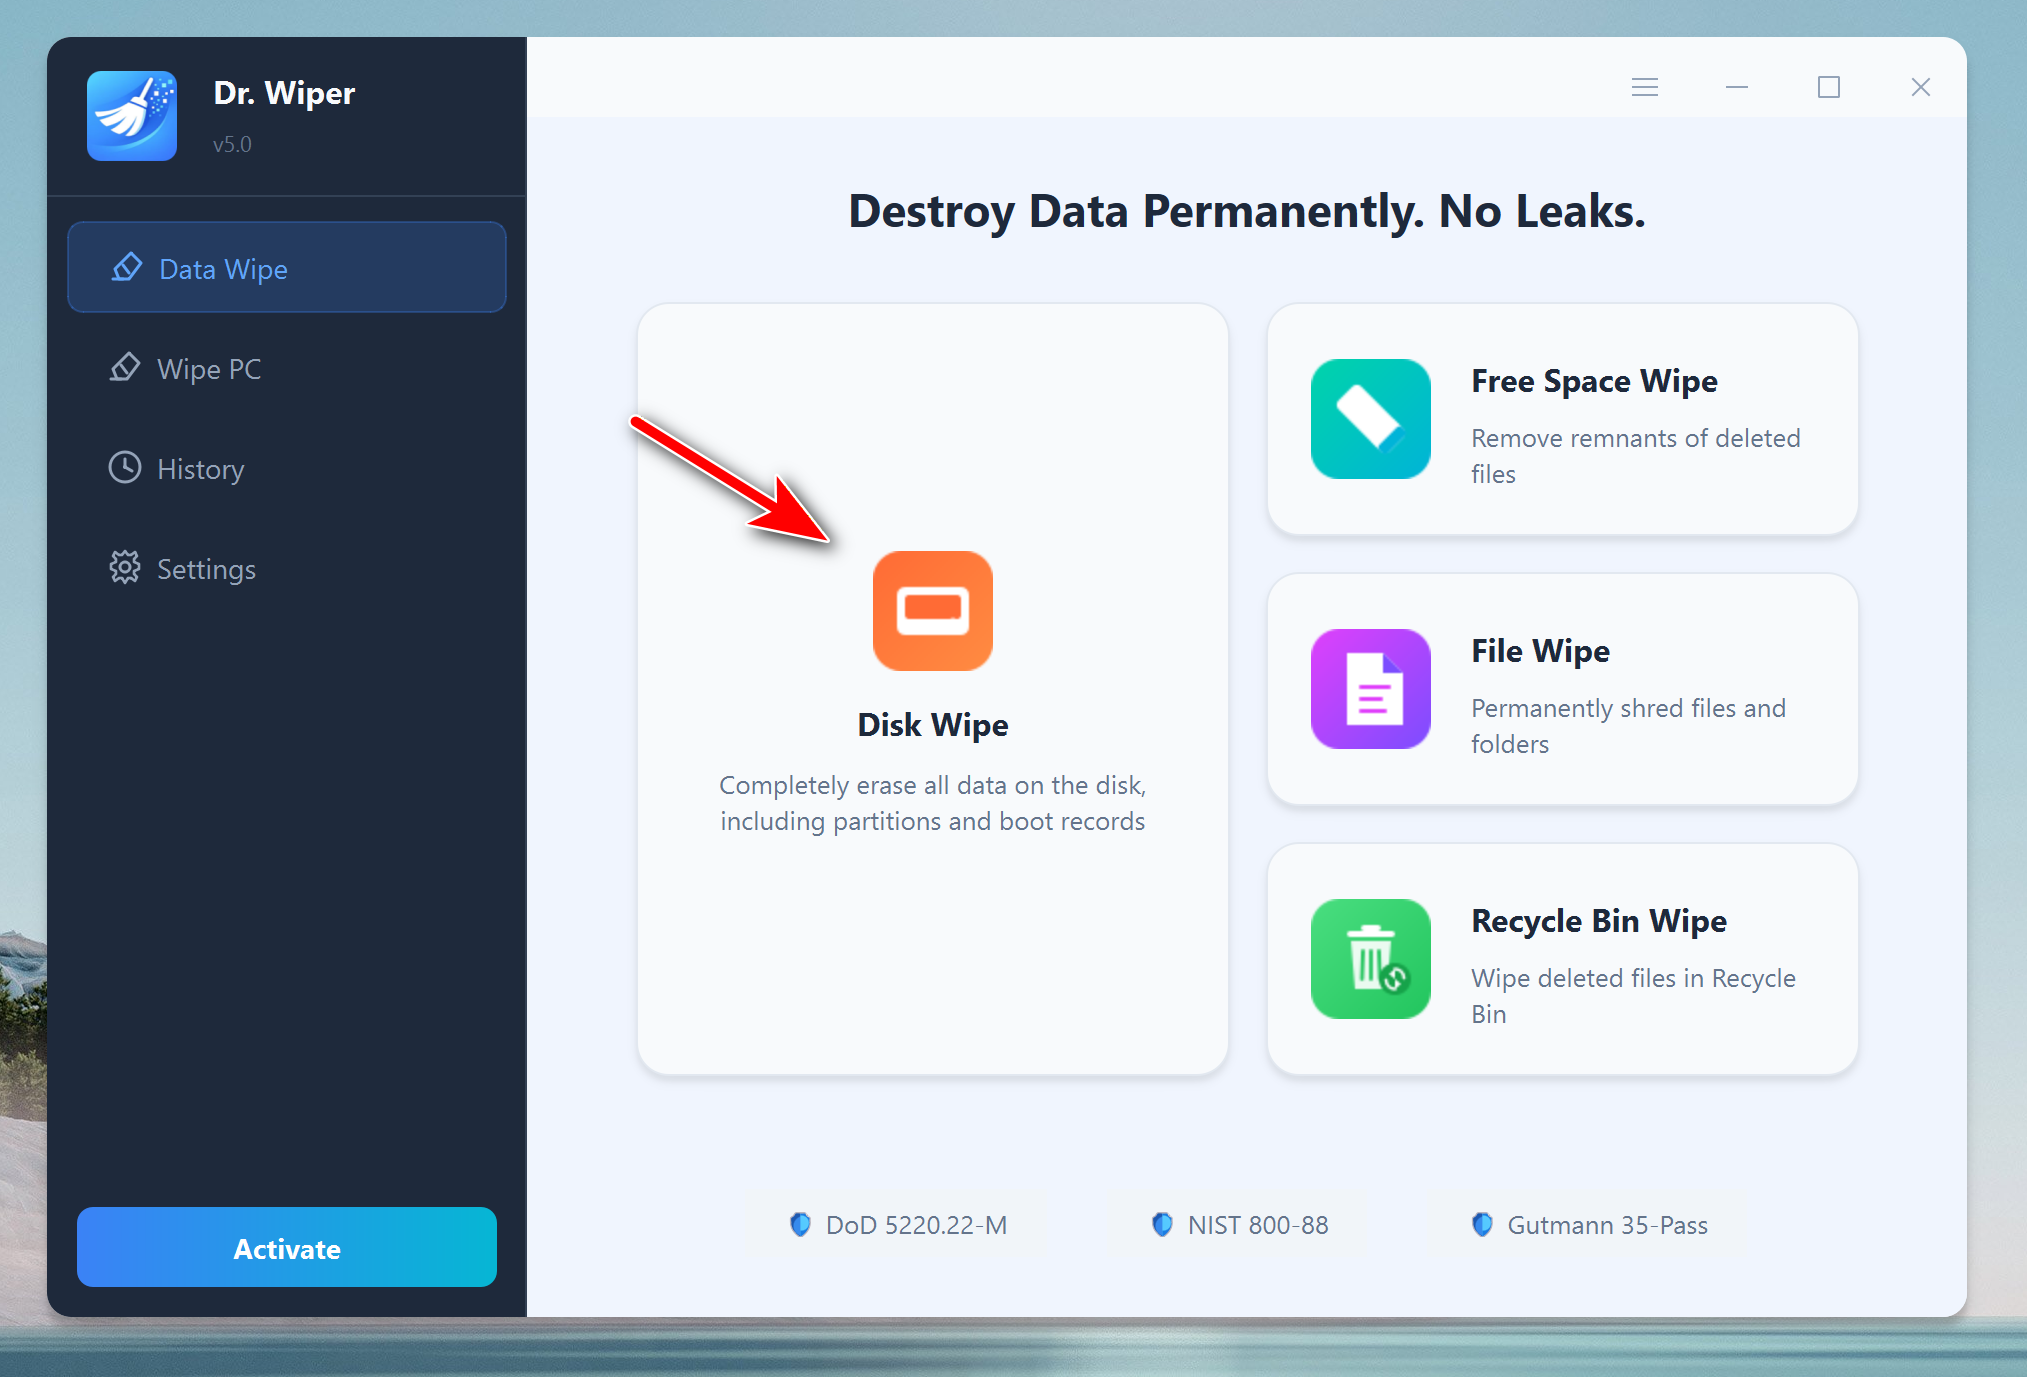
Step 2Select Data Wiping Method
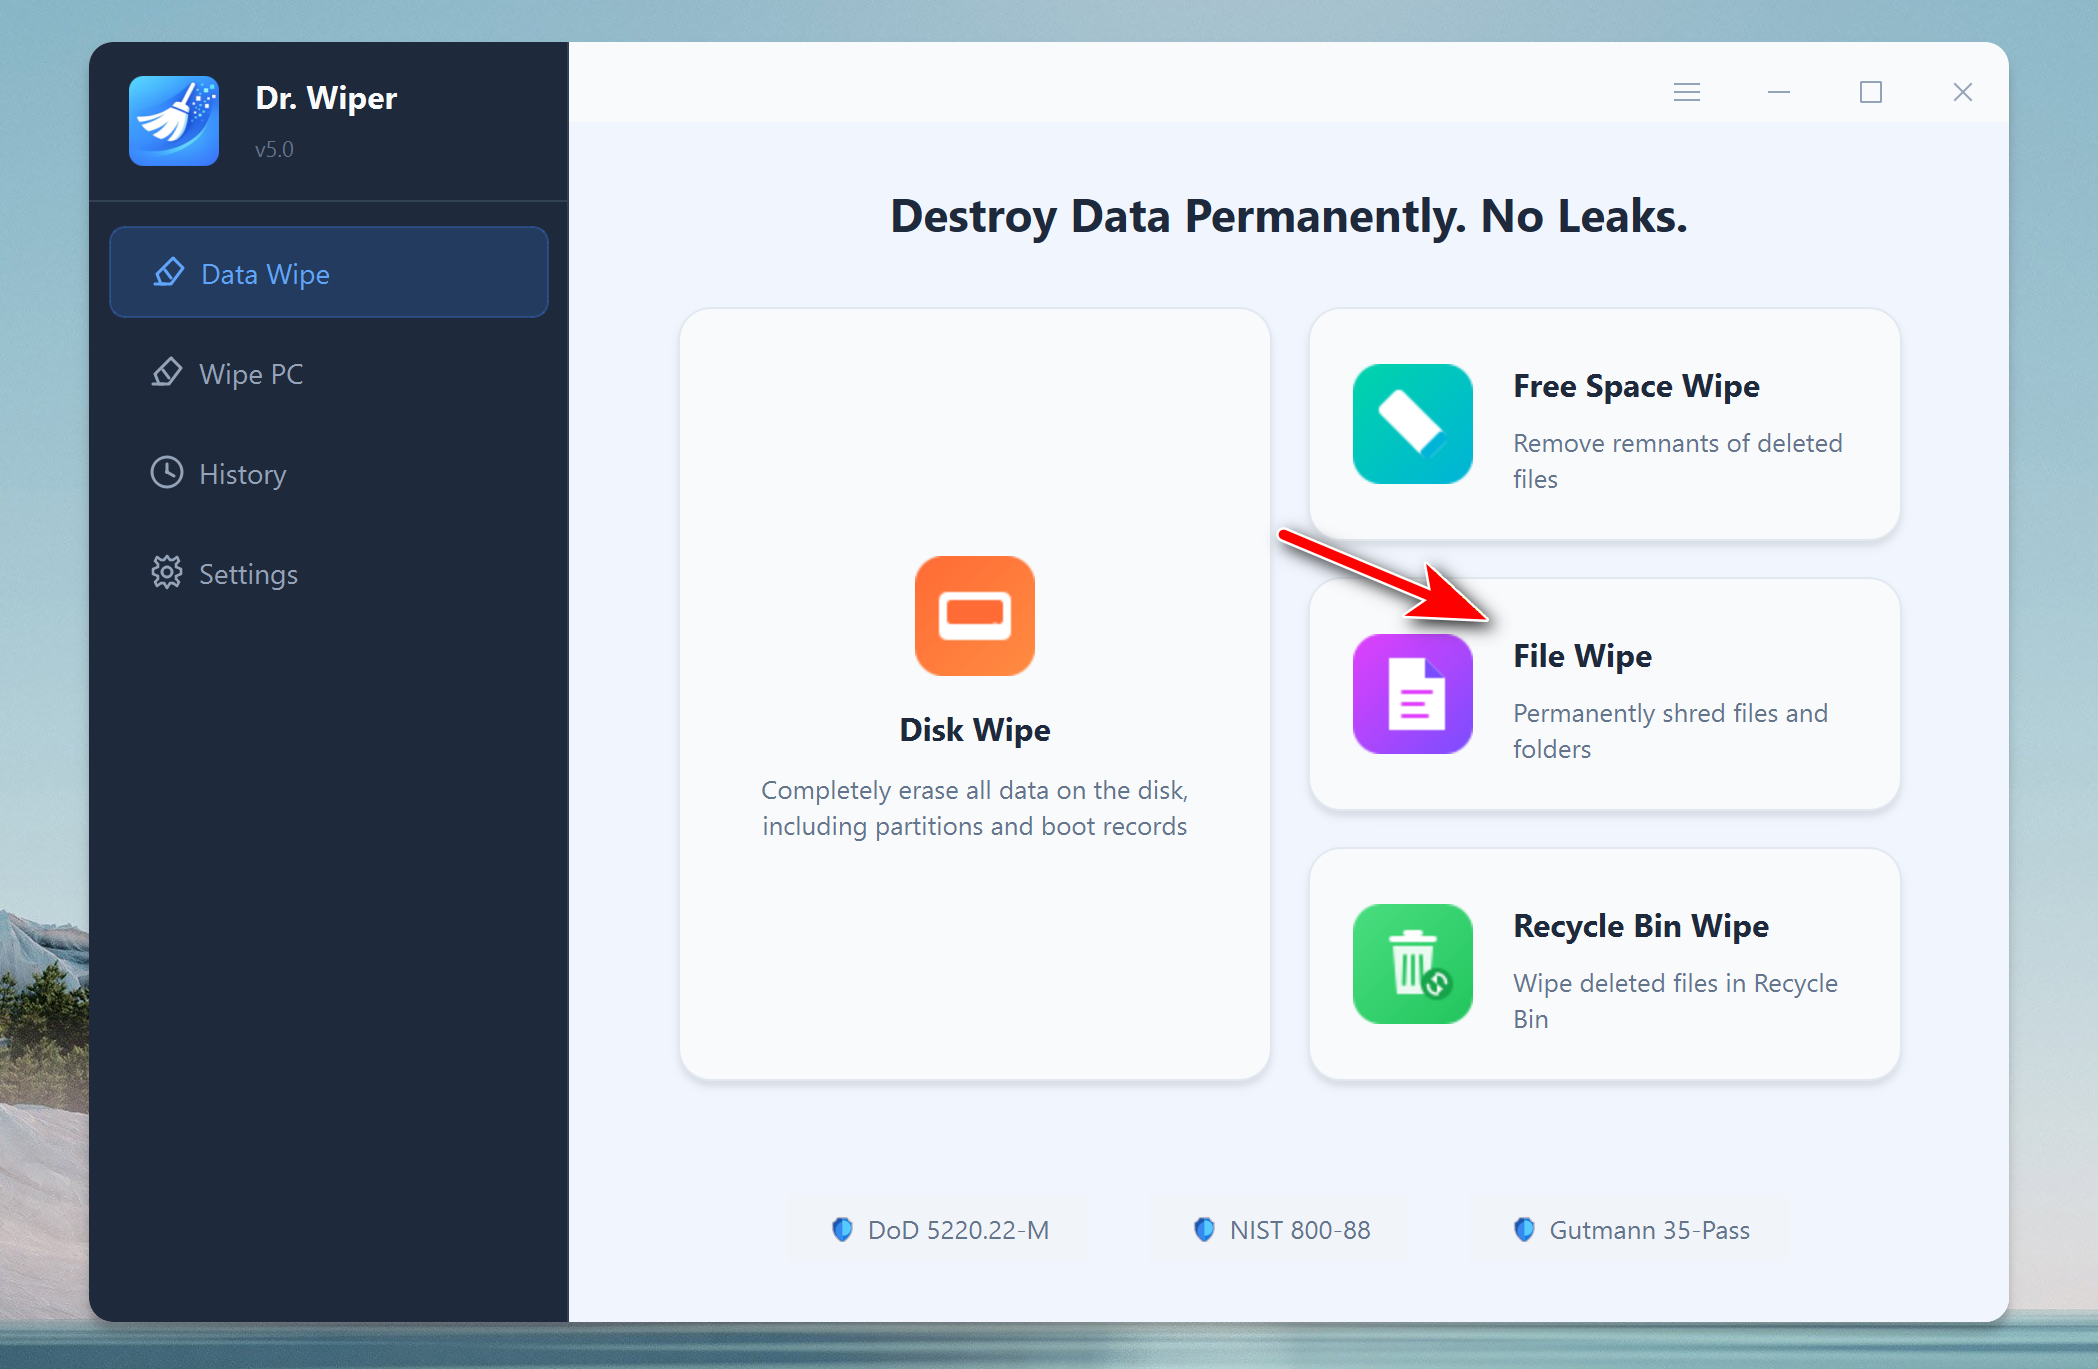
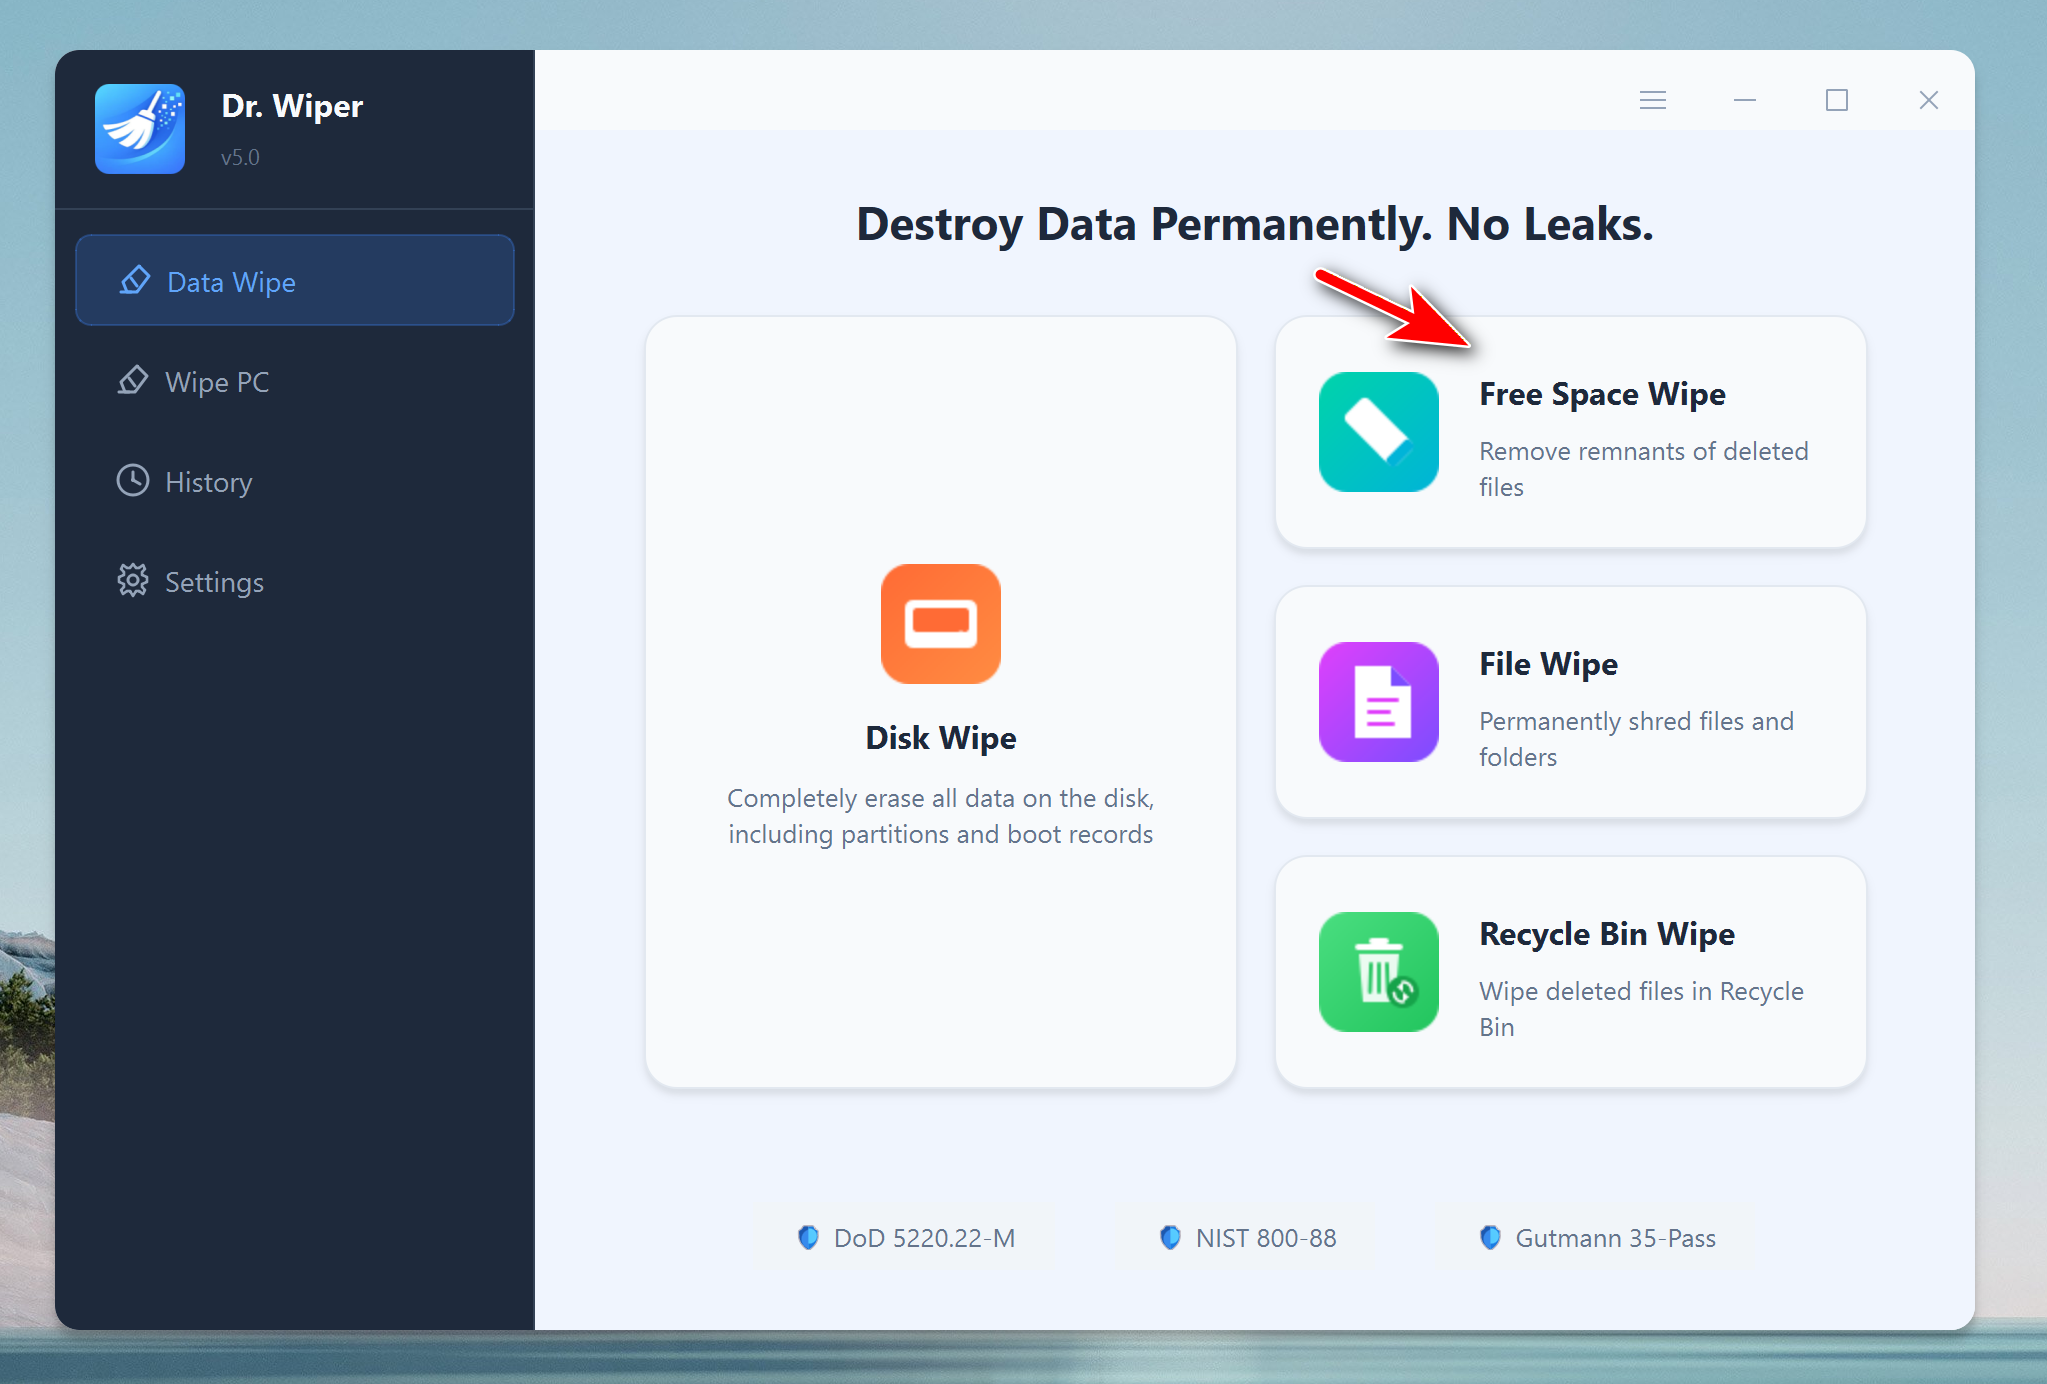
Open the Dr.Wiper program after installation. You will see four options: Disk Wipe, Free Space Wipe File Wipe and Recycle Bin Wipe. At this time, please click on the "Disk Wipe " option.
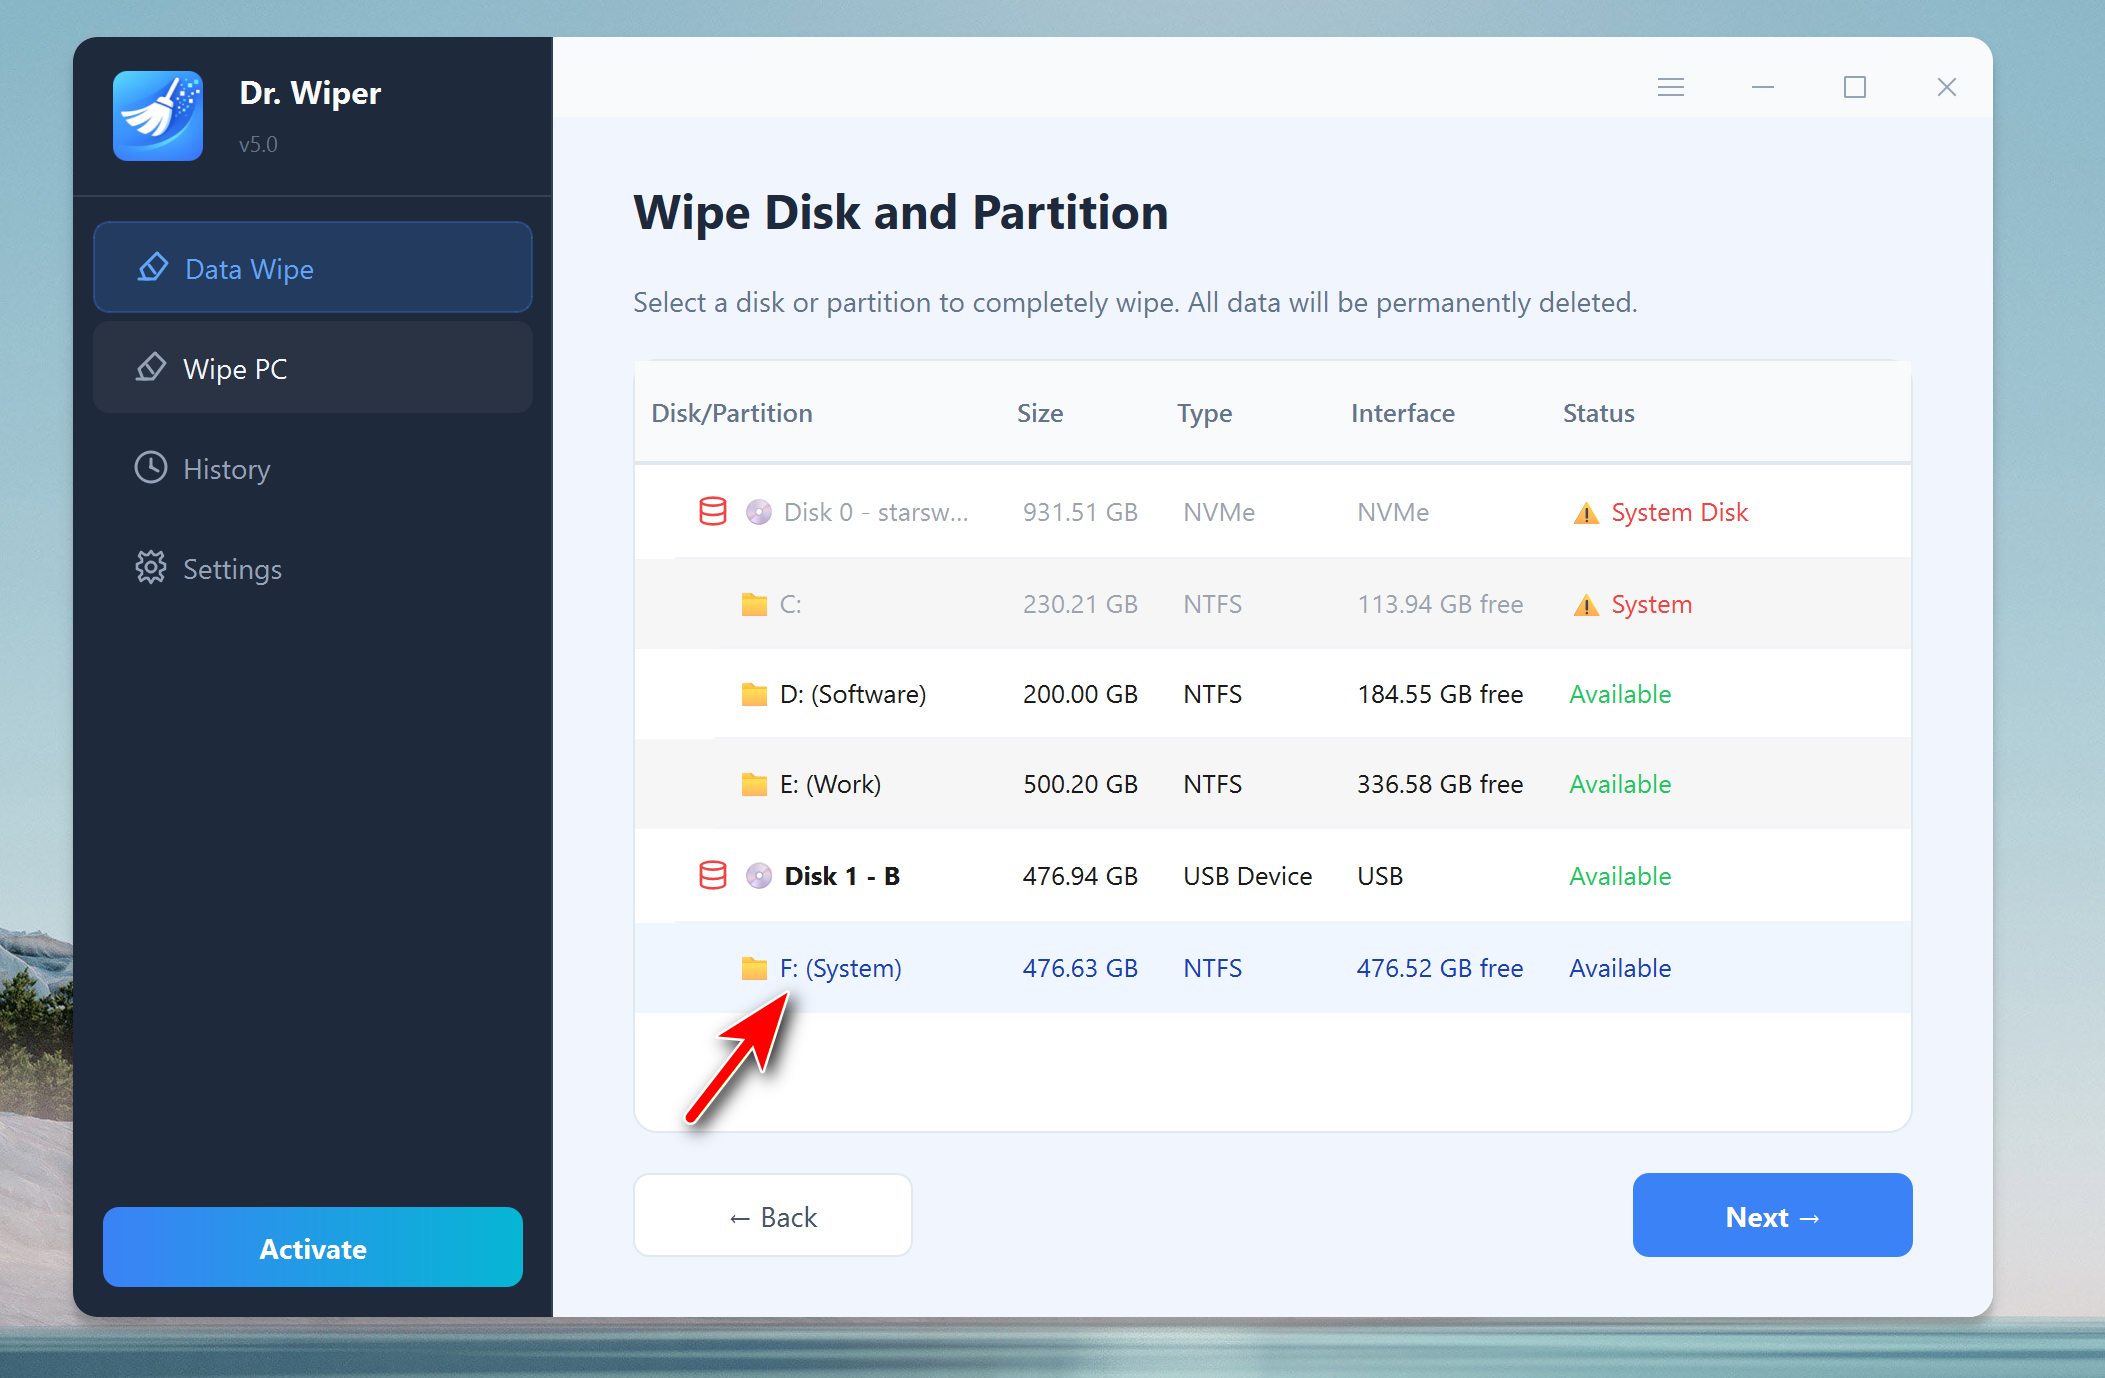
Step 3Choose the Target Disk or Partition
You'll be presented with a list of available disks connected to your computer. Select the one you wish to permanently wipe. Be cautious — all data on the selected disk will be irreversibly deleted.
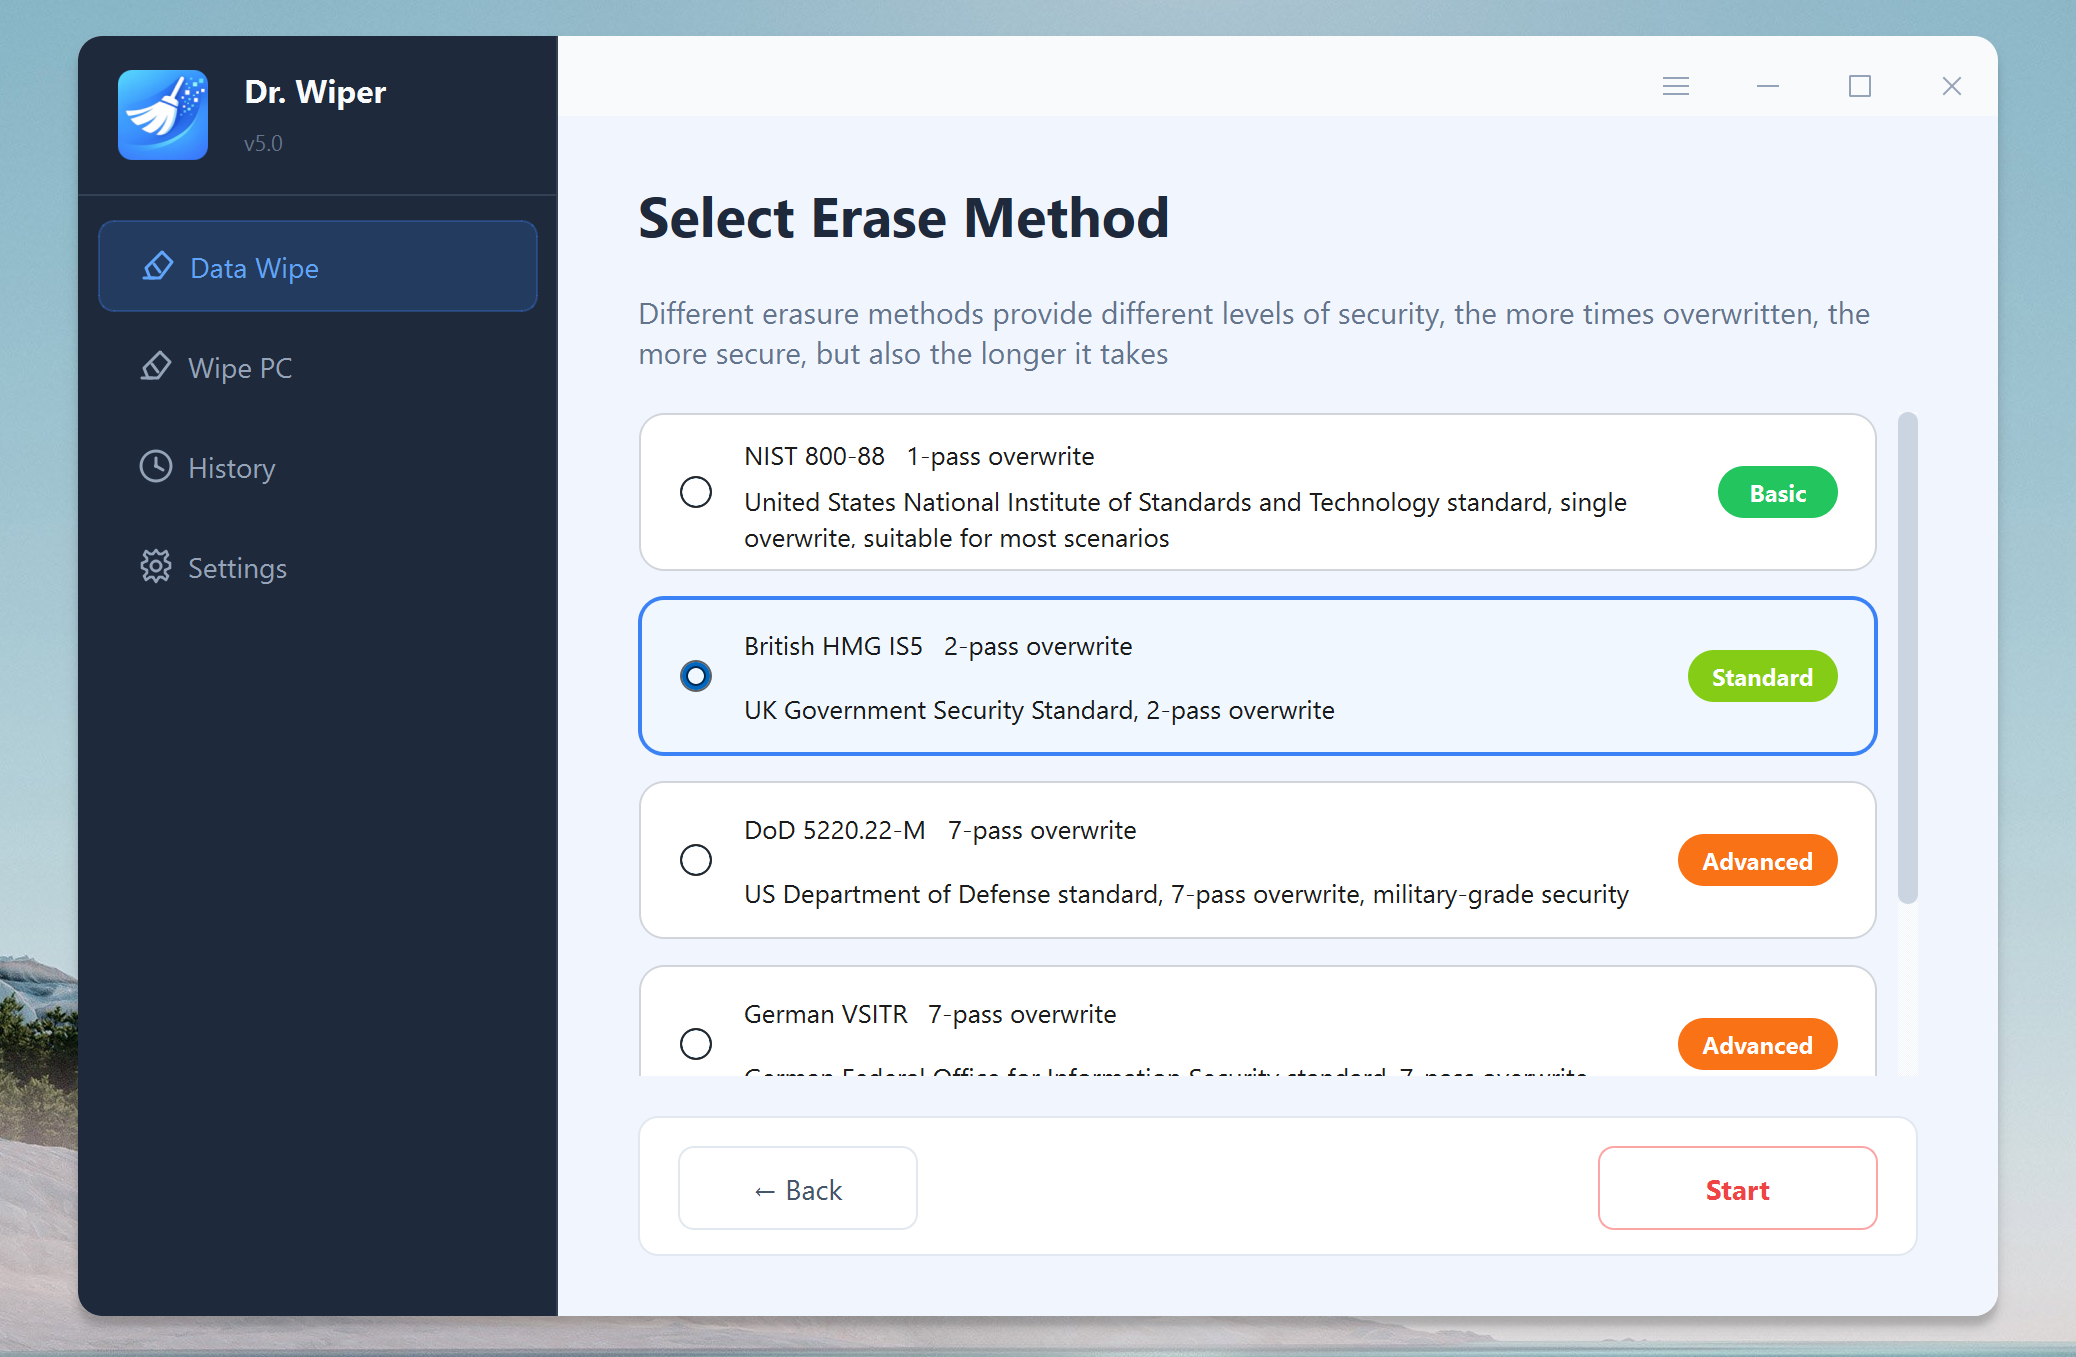
Step 4Choose a Wiping Algorithm
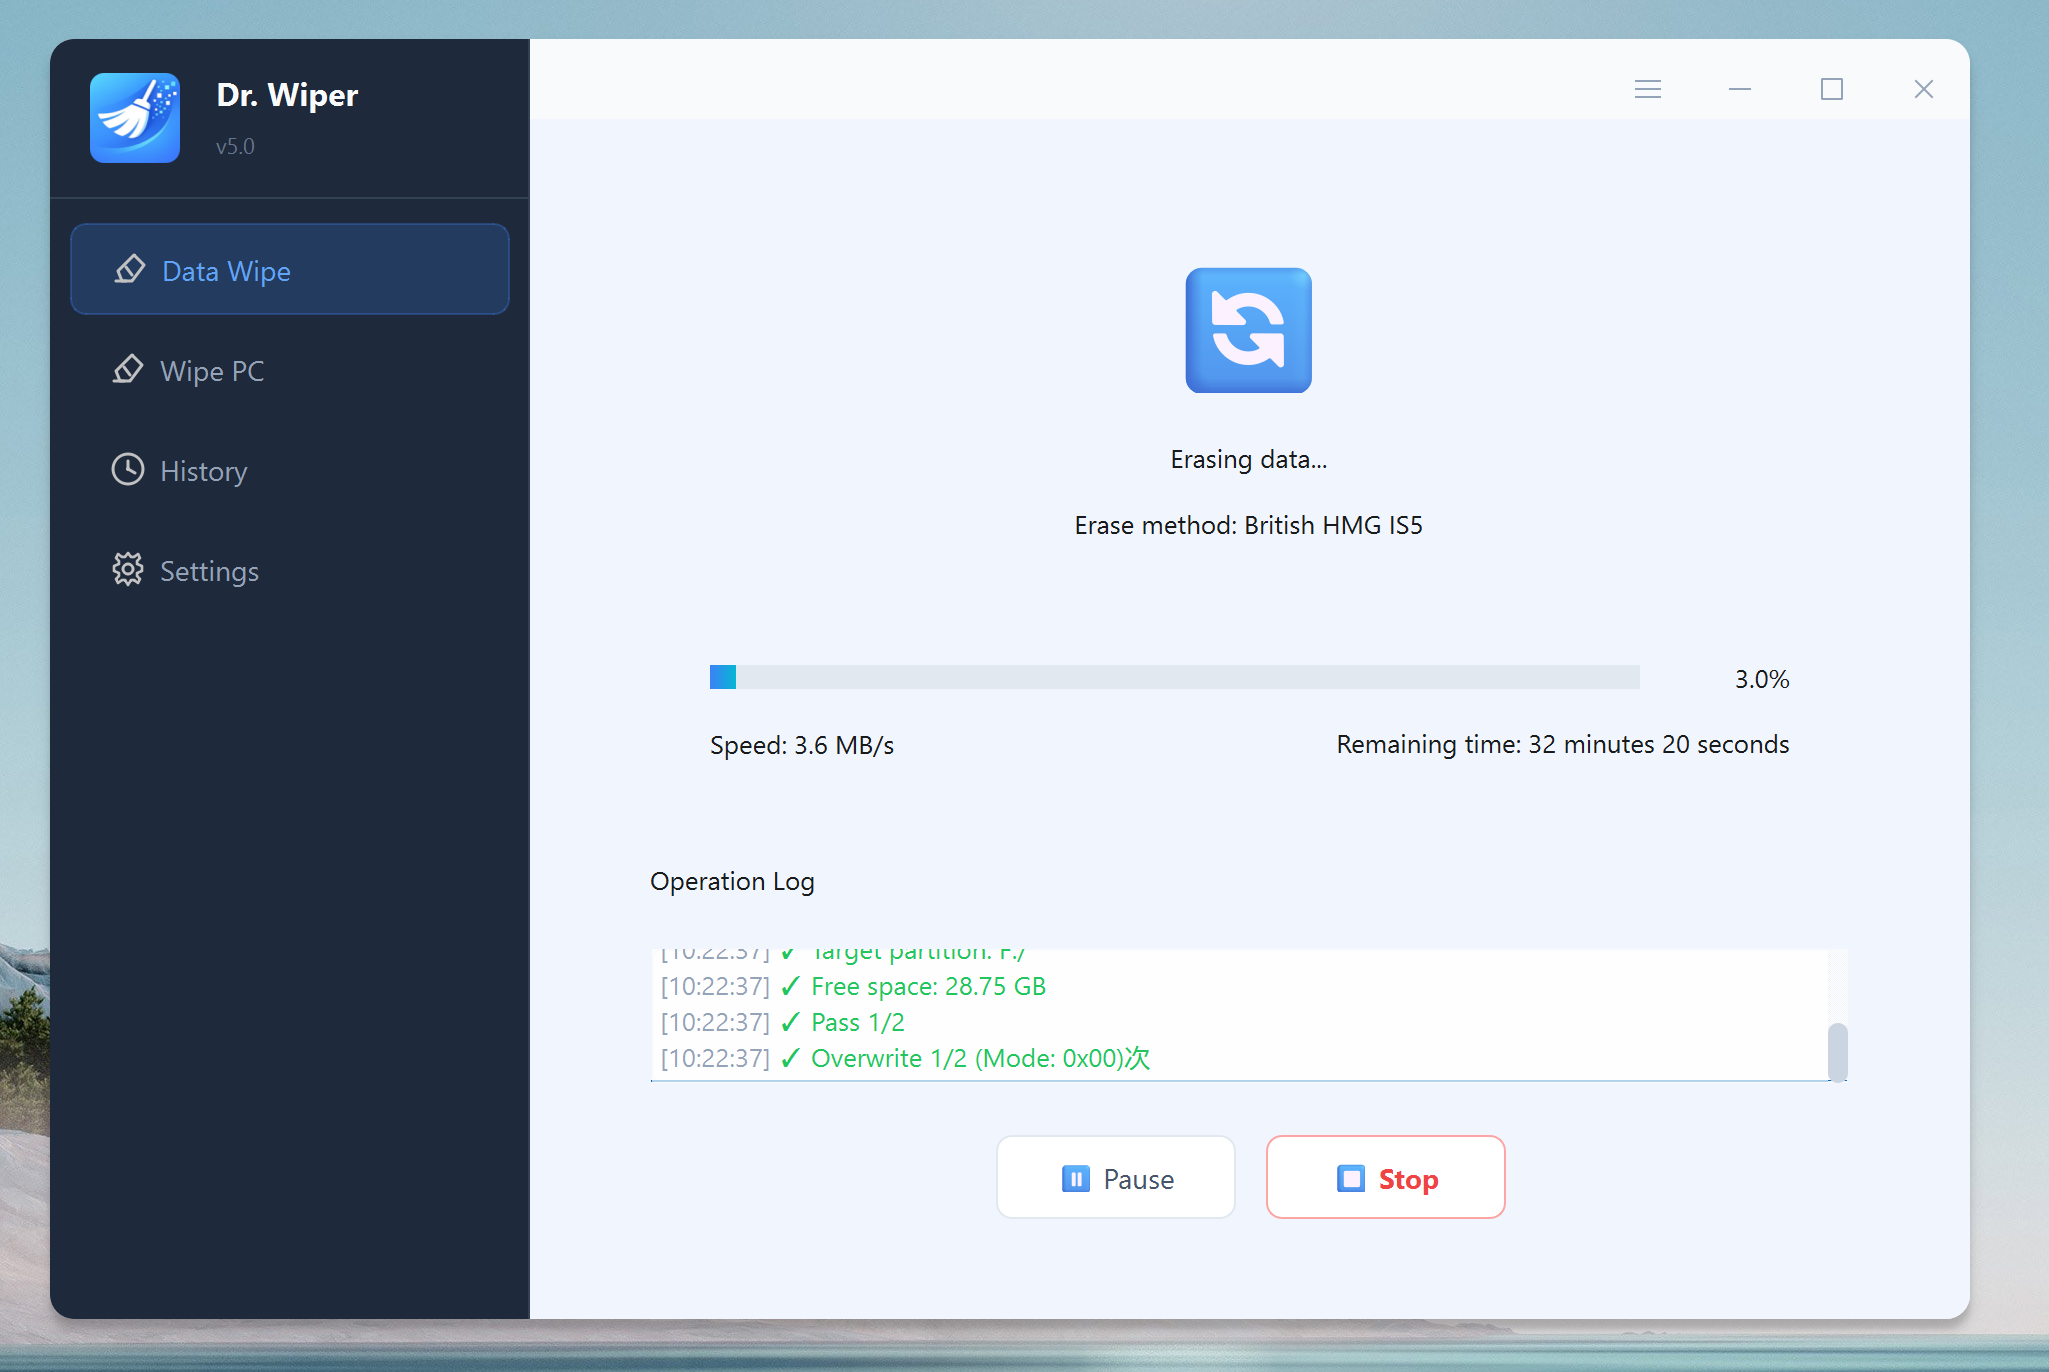
Dr.Wiper will prompt you to choose a data wiping method. You can select from secure standards like British HMG, German VSITR, DoD-5220.22-M, NIST-800-88 and Gutmann. All of them are safe and the files will be deleted permanently. However, the more pass count, the more time it takes to erase the files.
Step 5Start the Wiping Task
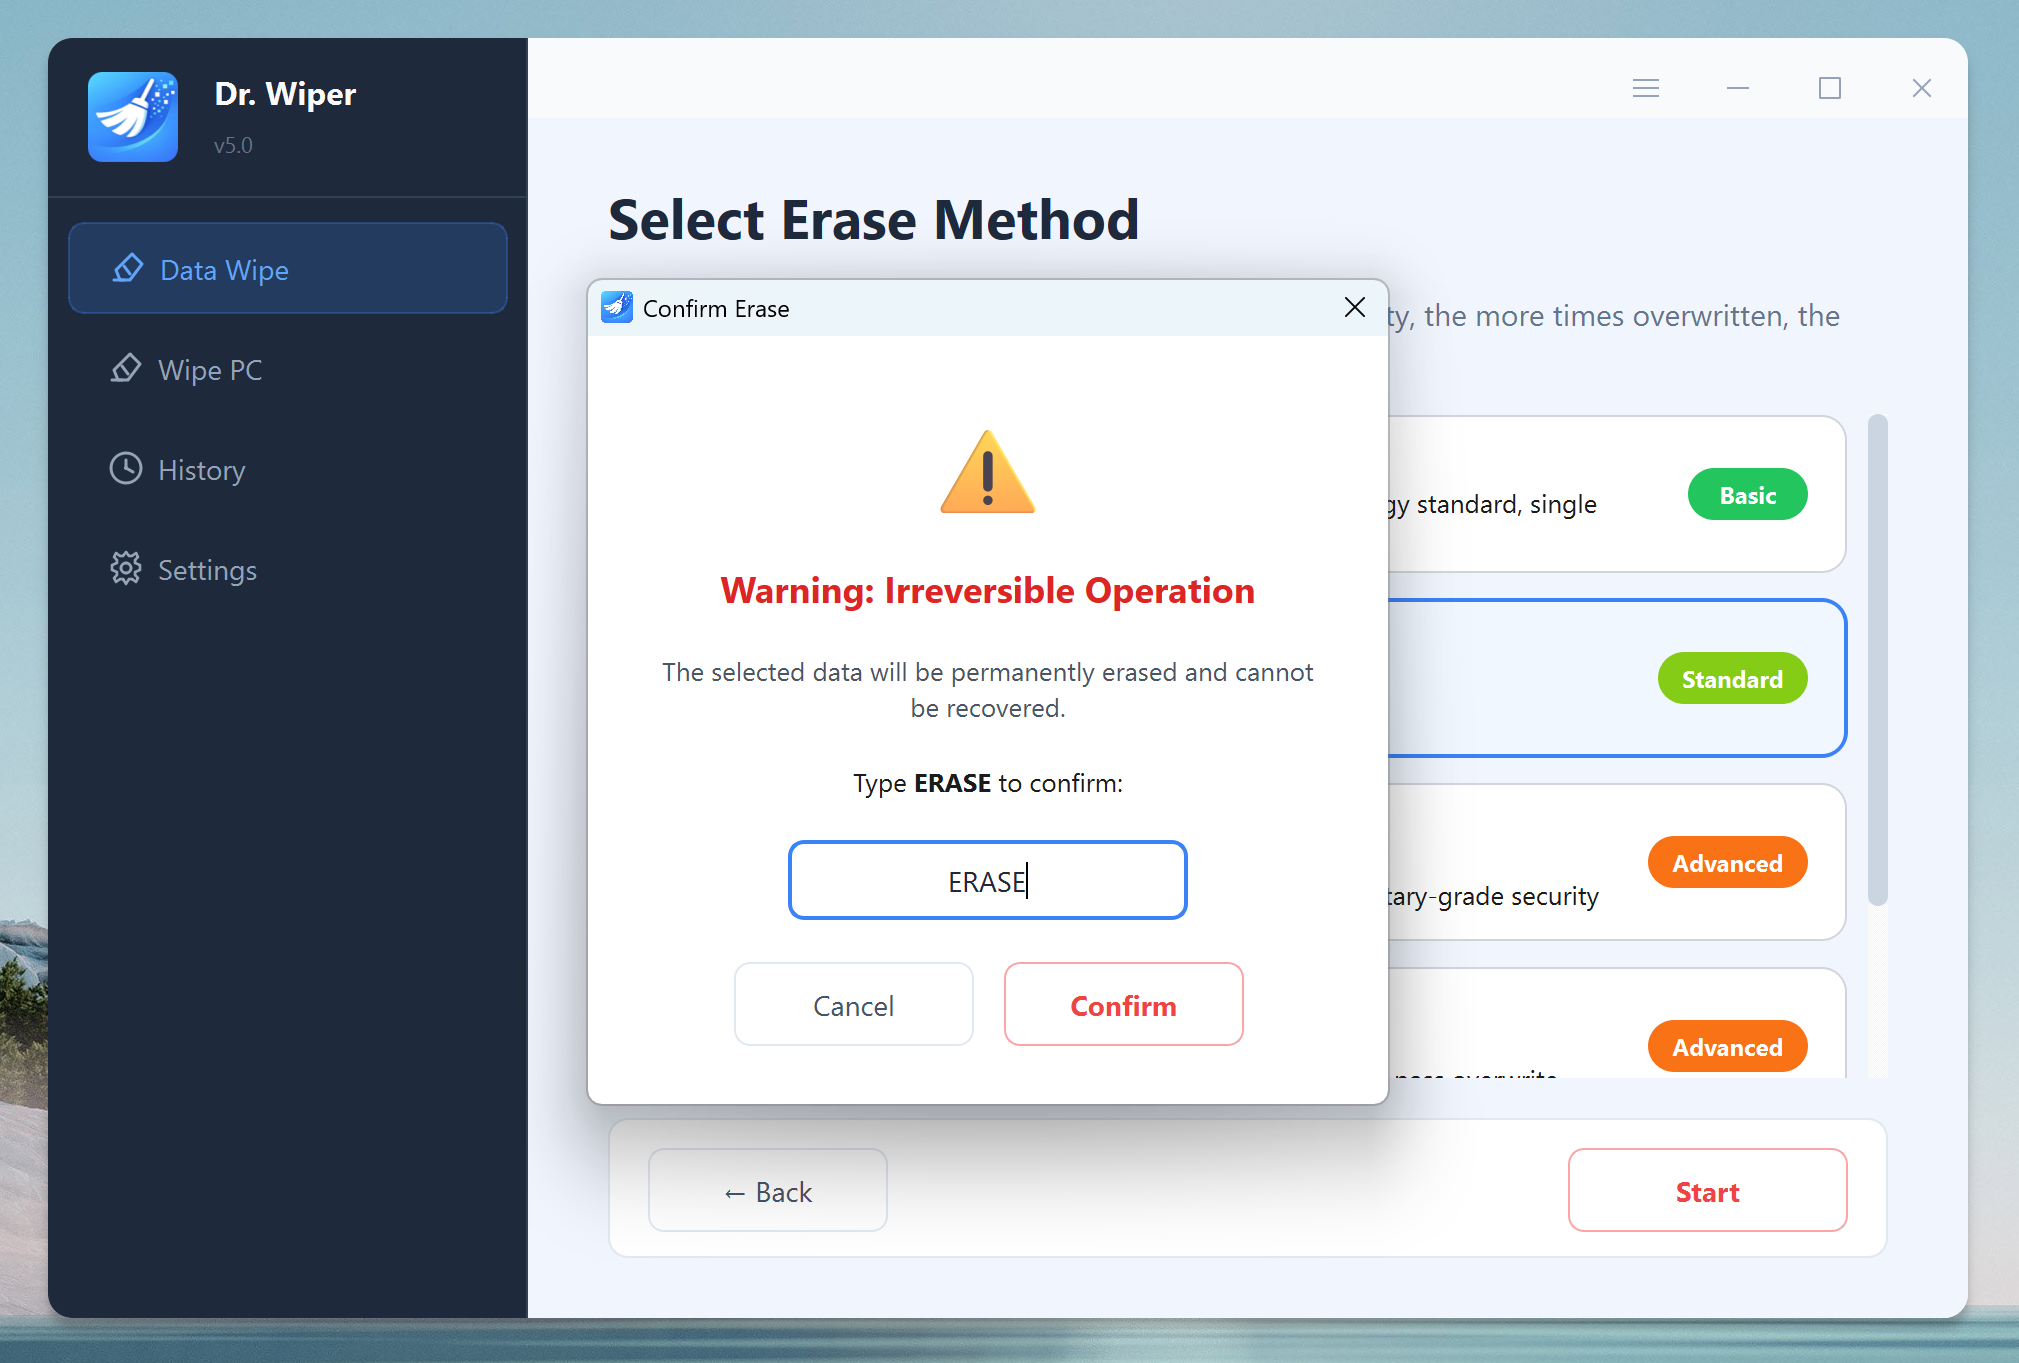
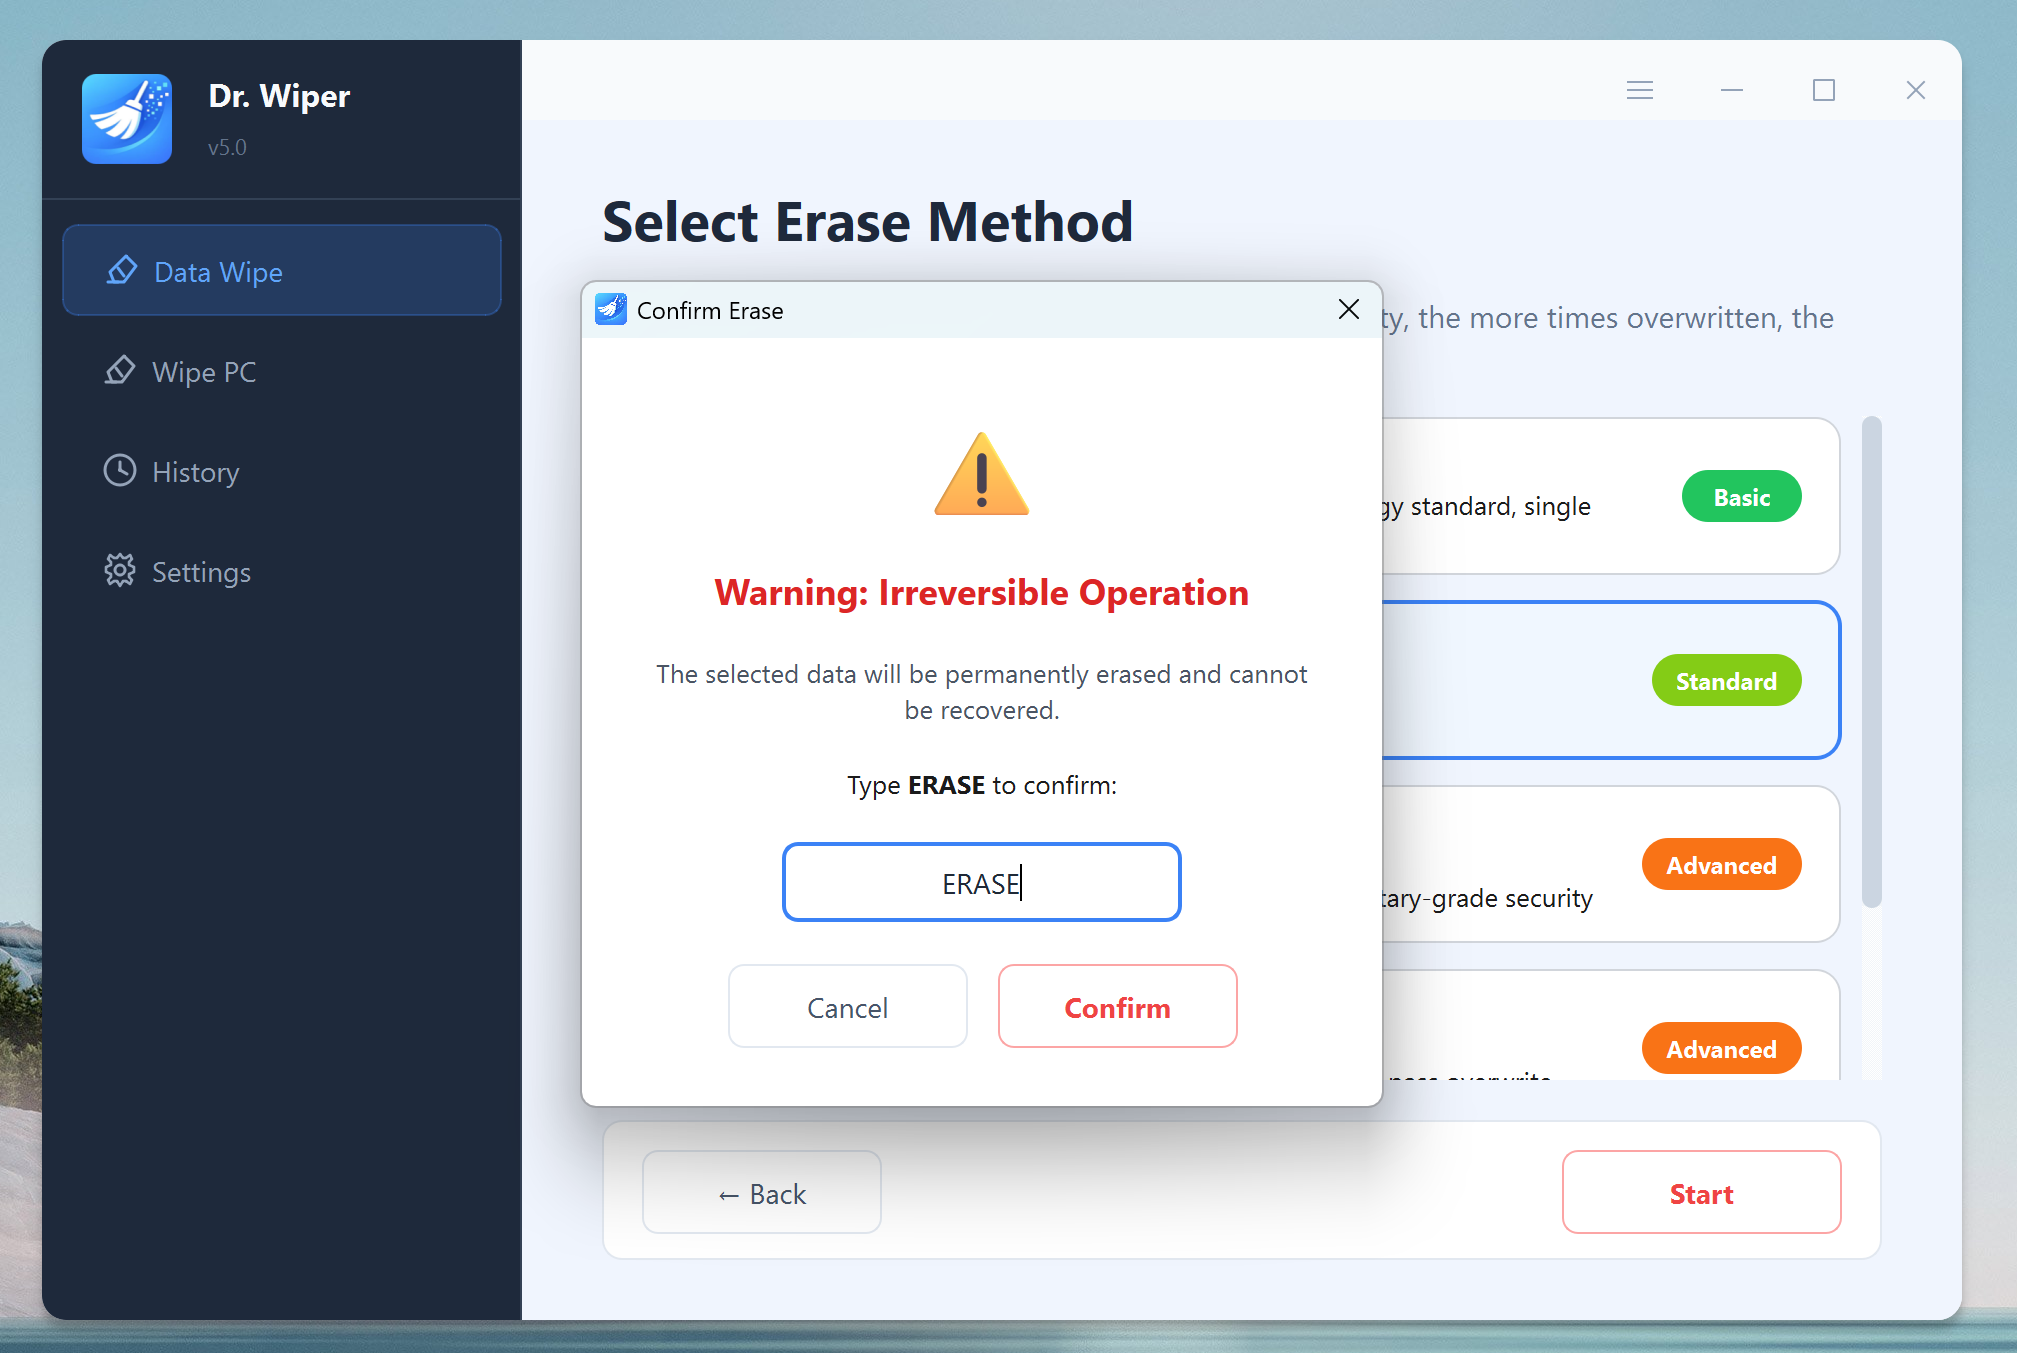
Confirm your selection and click the "Start" button at the bottom. At this time, you need to enter "Erase" to confirm the operation as it is a permanent deletion.
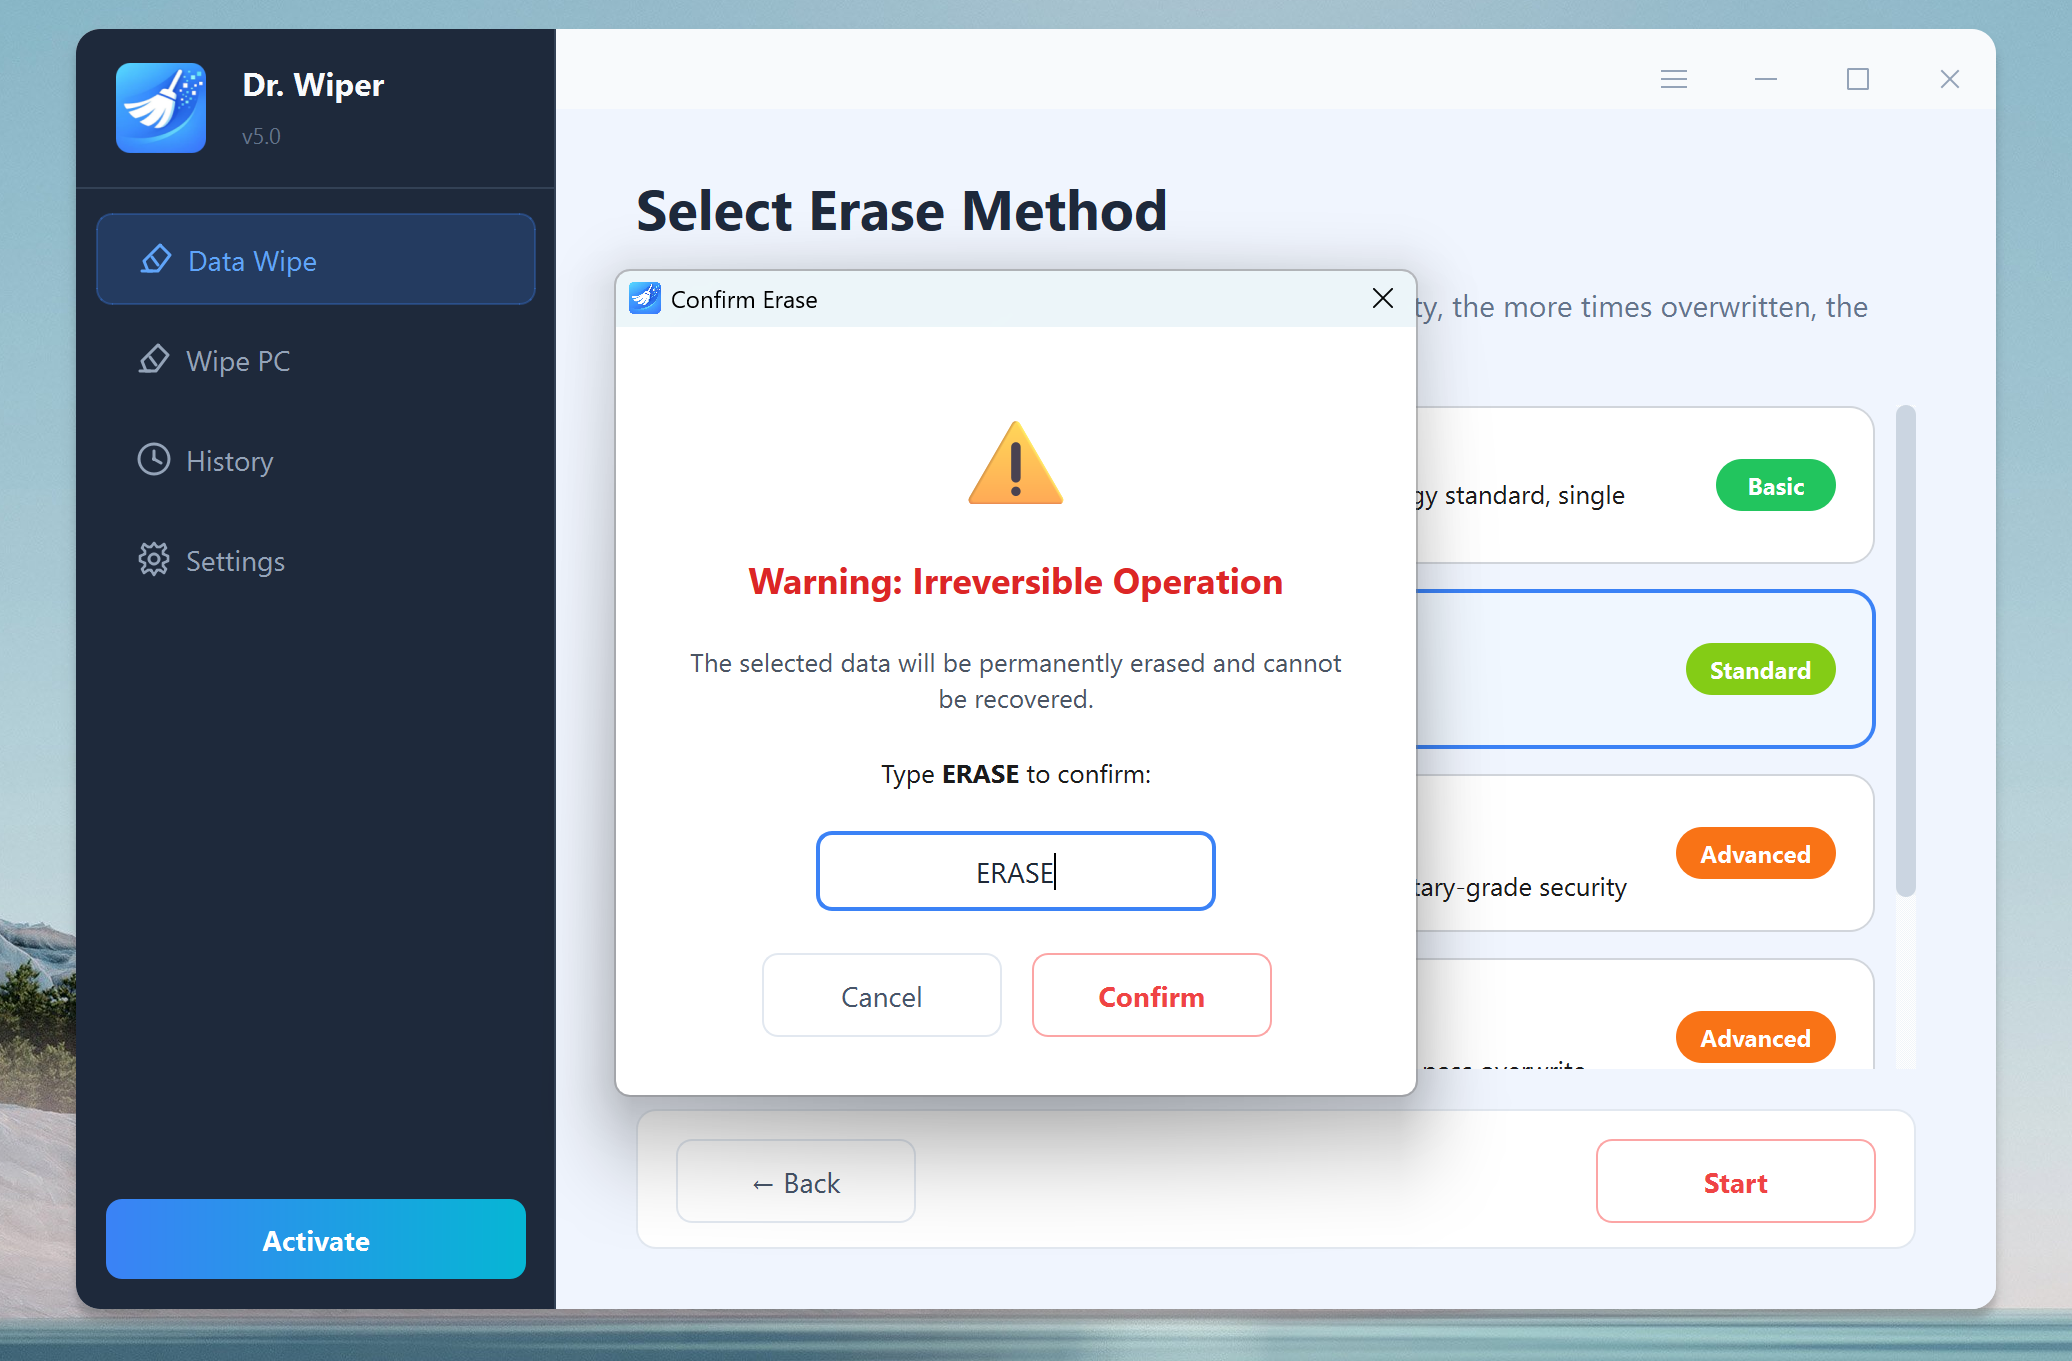
Next, click the Confirm button to start the wiping process. Dr.Wiper will begin overwriting the data, making recovery impossible.
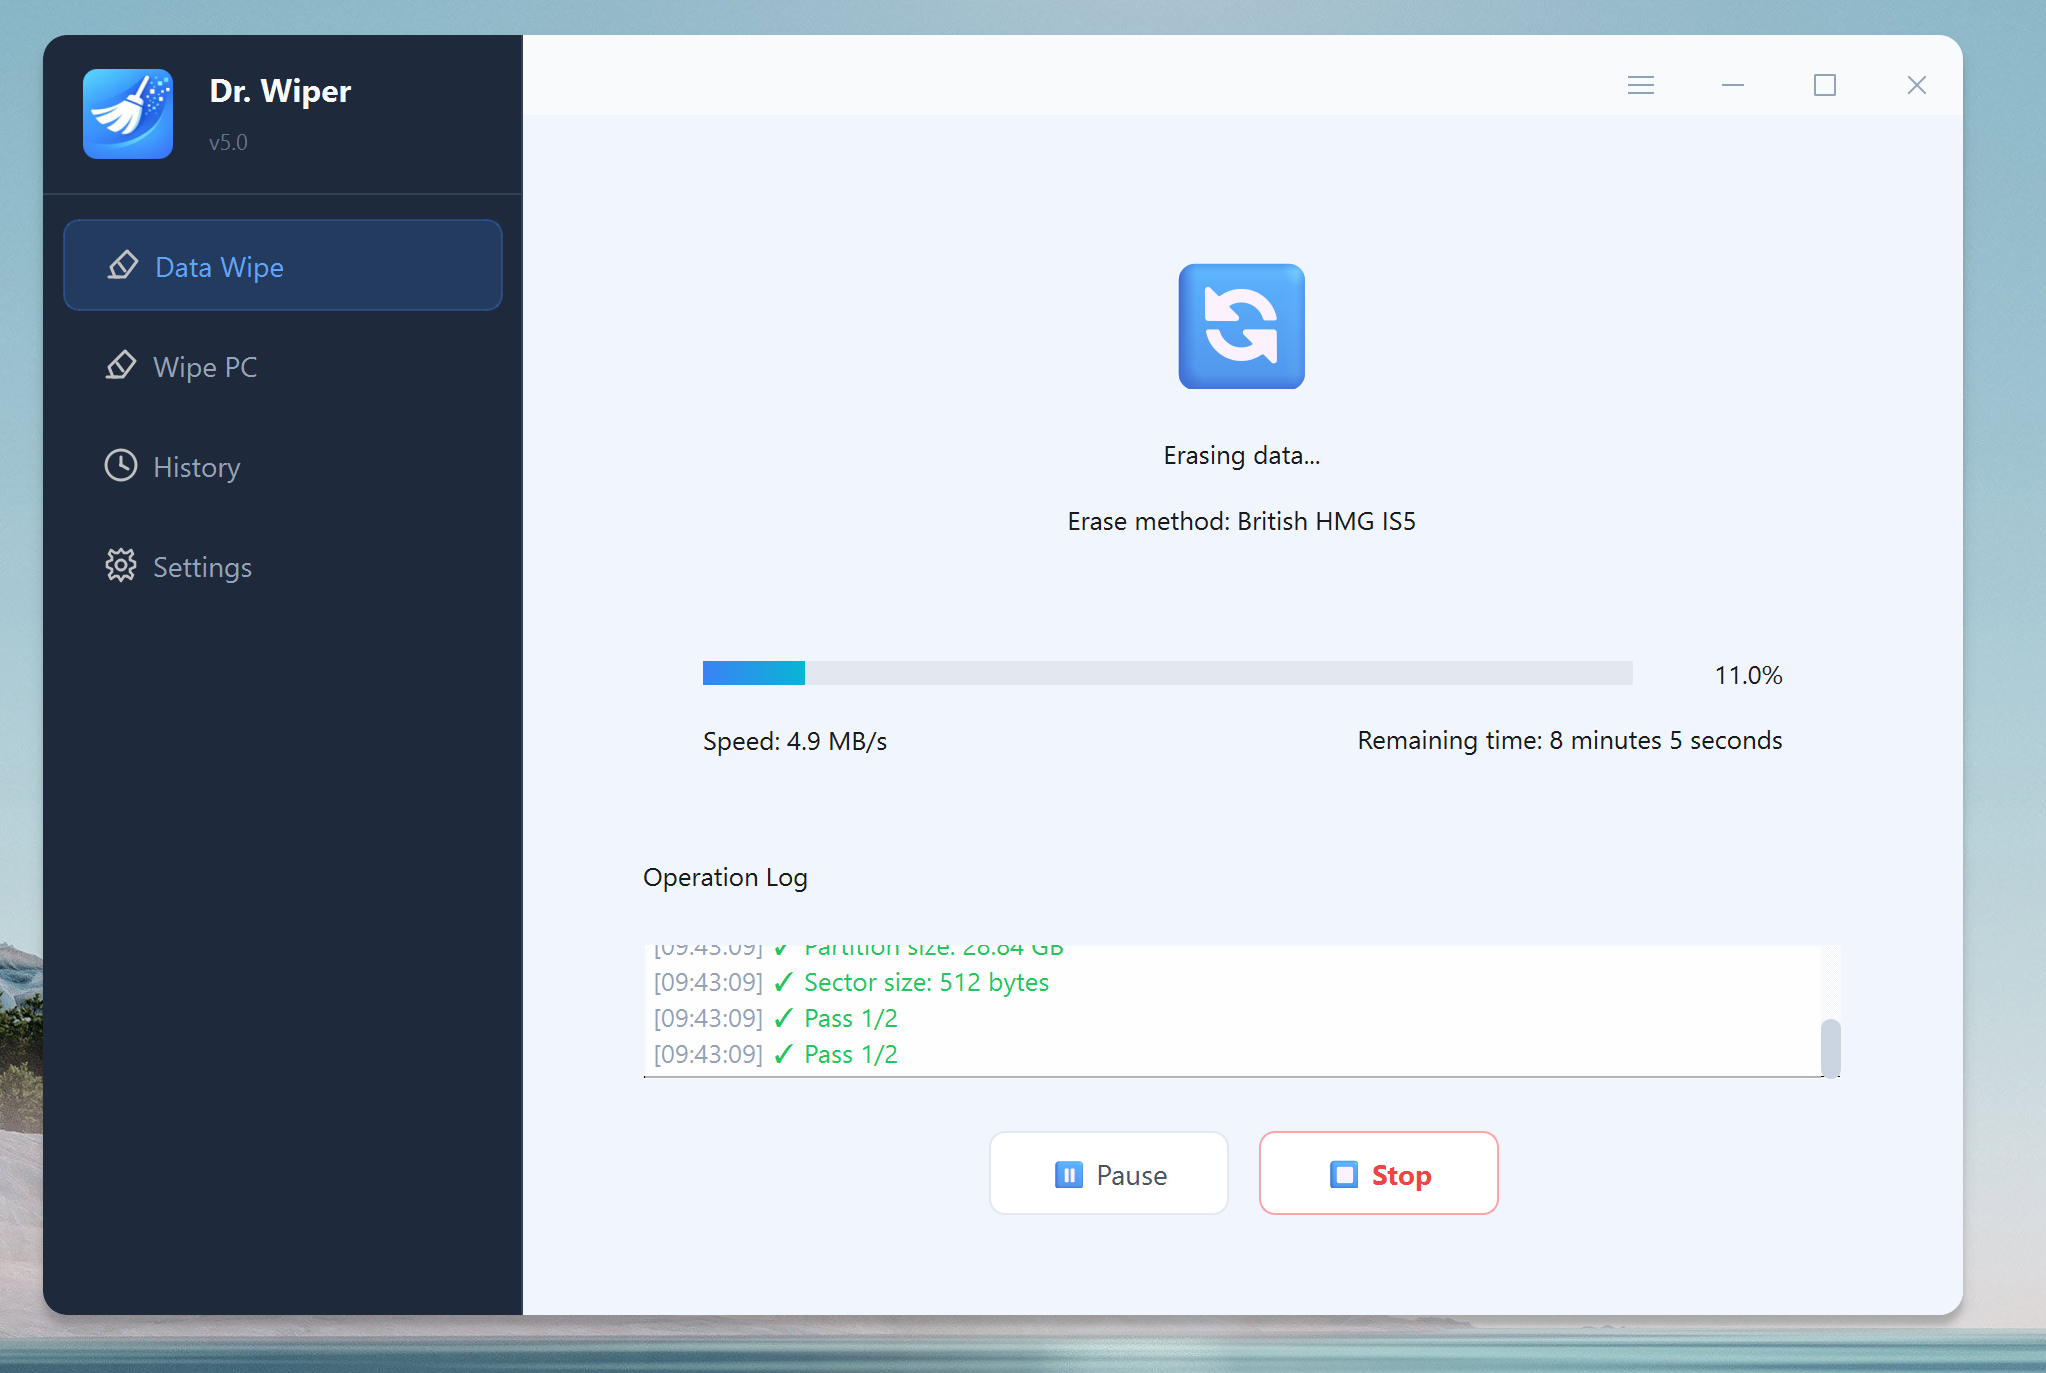
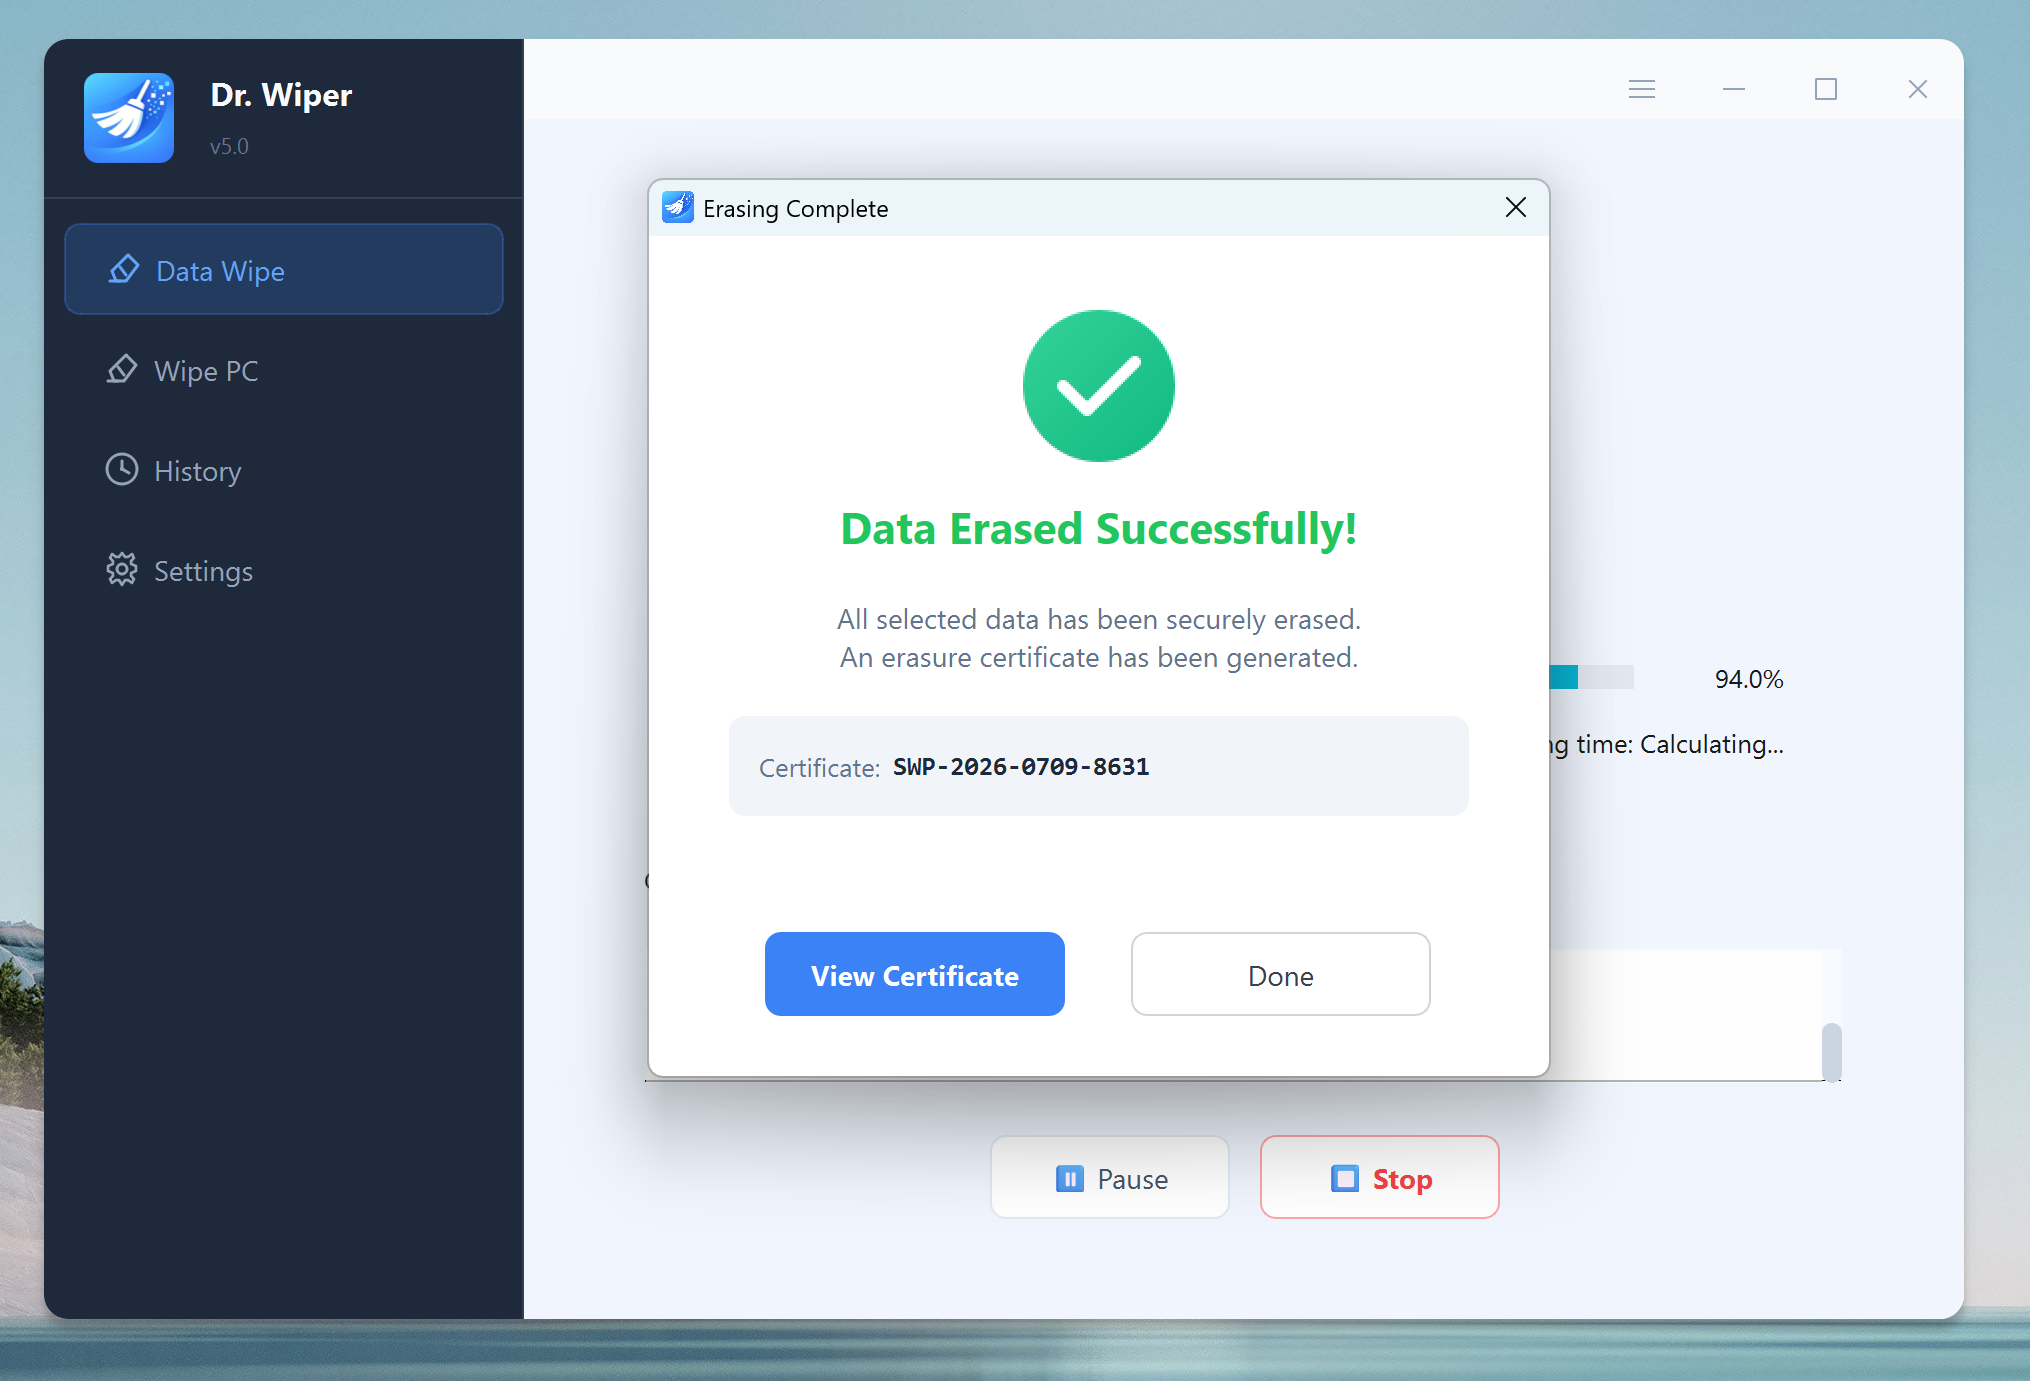
Depending on the size of your disk and the chosen wiping algorithm, this may take several minutes to several hours. Once completed, Dr.Wiper will notify you that the disk has been successfully wiped.
Free Trial Free Trial
Part 2. How to Permanently Delete Files with Dr.Wiper
Dr.Wiper is a reliable choice for permanently deleting files because it offers military-grade data erasure algorithms, such as DoD 5220.22-M and Gutmann, ensuring that deleted data cannot be recovered by any means.
Unlike standard deletion methods, Dr.Wiper securely overwrites the file content multiple times, making it ideal for wiping sensitive data from hard drives, SSDs, USB drives, and SD cards. Its user-friendly interface and ability to target specific files, partitions, or even free space make it a practical tool for both home users and professionals looking to securely erase confidential information.
Step 1Download and Install Dr.Wiper on Your Computer
First things first, download Dr.Wiper from the official site and install it. It's quick to set up and doesn't come with any unnecessary add-ons, which I always appreciate.
Free Trial Free Trial
Step 2Select Data Wiping Method
Open the Dr.Wiper program after installation. Please click on the "File Wipe " option.
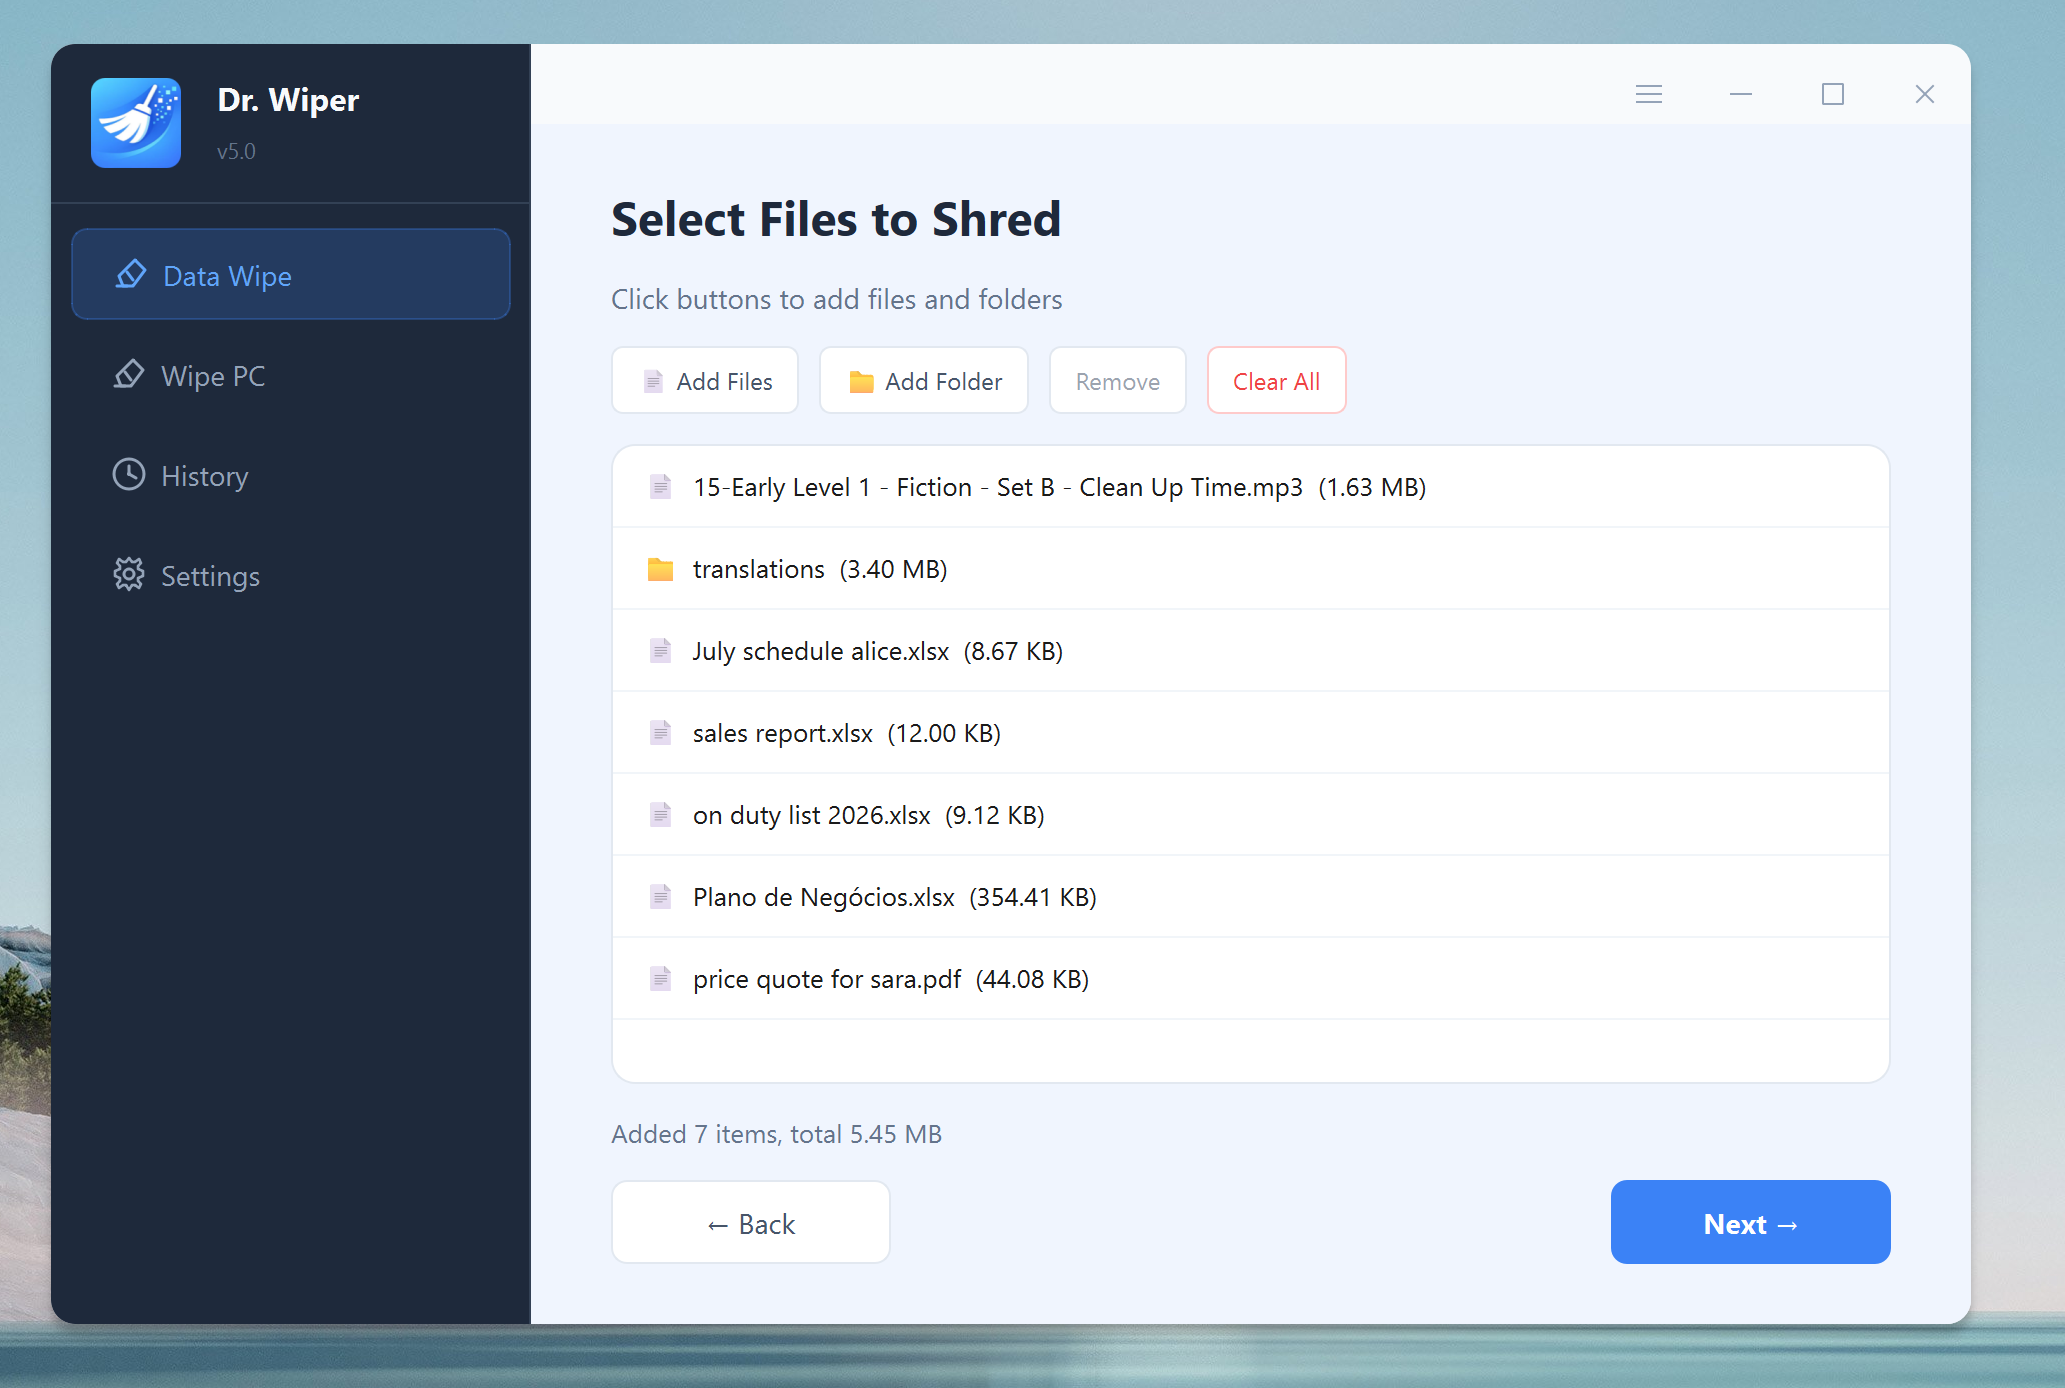
Step 3Add Files to Dr.Wipe
Click the "Add Files" menu at the top to import the files from the computer to the app. These files are the ones to be permanently deleted. You can also drag and drop the files into the app interface. After that, click the "Next" button to move to the next step.
Step 4Choose a Wiping Algorithm
Dr.Wiper will prompt you to choose a data wiping method. You can select from secure standards like British HMG, German VSITR, DoD-5220.22-M, NIST-800-88 and Gutmann. All of them are safe and the files will be deleted permanently. However, the more pass count, the more time it takes to erase the files.
Confirm your selection and click the "Start" button at the bottom.
Step 5Start Deleting the Files Permanently
At this time, you need to enter "ERASE" to confirm the operation as it is a permanent deletion. Next, click the Confirm button to start the wiping process. Dr.Wiper will begin overwriting the data, making recovery impossible.
The process might take a few minutes depending on the size of imported files. Once done, your selected files will be securely wiped. And there is no chance to recover the deleted files!
 Free Trial
Free Trial
Free Trial
Part 3. How to Permanently Wipe Free Space with Dr.Wiper
Even after deleting files and emptying the Recycle Bin, traces of those files may still linger in the free space of your drive — and can be recovered using data recovery tools. With Aiseefox Dr.Wiper, you can securely wipe the free space on a drive to ensure previously deleted data is permanently erased and unrecoverable.
Step 1Download and Install Dr.Wiper on Your Computer
First things first, download Dr.Wiper from the official site and install it.
Free Trial Free Trial
Step 2Select Data Wiping Method
Open the Dr.Wiper program after installation.At this time, please click on the "Free Space Wipe" option.
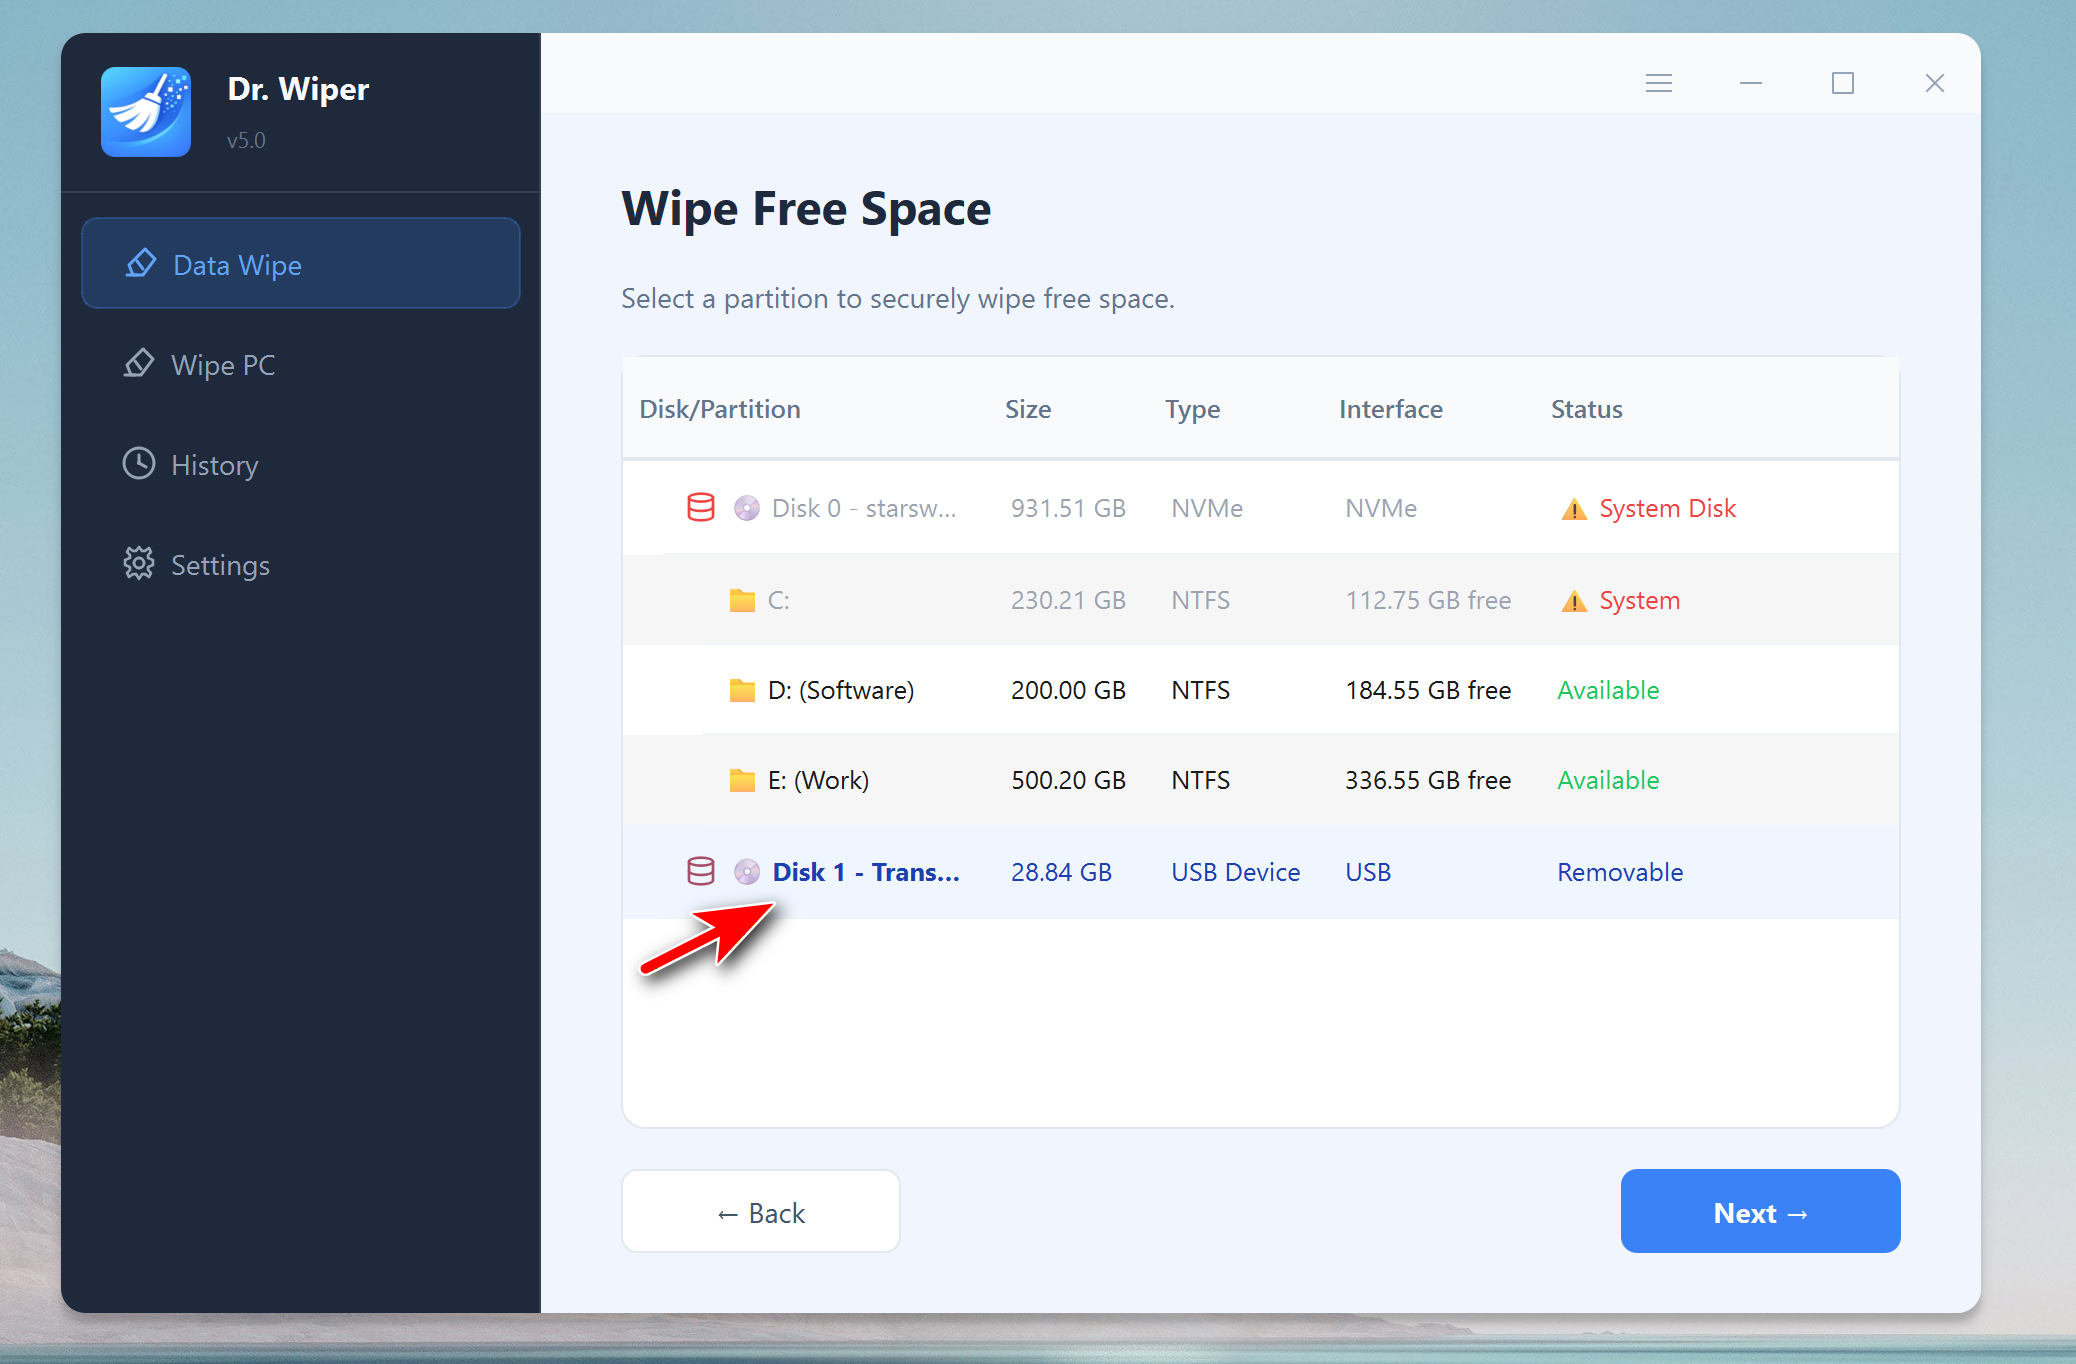
Step 3Choose the Target Disk or Partition
You'll be presented with a list of available disks connected to your computer. Select the one you wish to permanently wipe. Be cautious — all data on the selected disk will be irreversibly deleted.
Step 4Choose a Wiping Algorithm
Dr.Wiper will prompt you to choose a data wiping method. You can select from secure standards like British HMG, German VSITR, DoD-5220.22-M, NIST-800-88 and Gutmann. All of them are safe and the files will be deleted permanently. However, the more pass count, the more time it takes to erase the files.
Step 5Start Wiping Free Space on Target Disk
Confirm your selection and click the "Start" button at the bottom. At this time, you need to enter "ERASE" to confirm the operation as it is a permanent deletion.
Next, click the Confirm button to start the wiping process. Dr.Wiper will begin overwriting the data, making recovery impossible.
The time it takes to wipe free space depends on the size of the drive and the algorithm you selected. Once complete, Dr.Wiper will notify you that the operation has finished successfully.
Free Trial Free Trial
Conclusion
With Aiseefox Dr.Wiper, securely erasing your data is no longer a complex or risky process. From wiping individual files to performing a full disk sanitization, Dr.Wiper offers an intuitive interface combined with robust data deletion standards to protect your privacy. Whether you're cleaning up a personal device or preparing to dispose of old hardware, following the steps in this guide will ensure your sensitive data is completely unrecoverable.

Mateo Ryan
Mateo is a senior editor at Aiseefox and lifelong tech enthusiast with over a decade of experience writing thousands of articles about Windows and macOS. Beyond writing, Mateo enjoys creating short explainer videos, gaming and exploring animated shows.